Your Guide To Free Remote IoT Monitoring With Raspberry Pi
Ever wondered how you could keep an eye on your home garden's moisture levels, track room temperature, or just make sure your pet feeder is working, all from a distance, and without spending a fortune? You're in luck, because setting up free remote IoT monitoring Raspberry Pi projects is a very real possibility for anyone with a bit of curiosity. It’s a wonderful way to bring your ideas to life, giving you a peek into what your devices are doing, no matter where you are. This kind of setup means you get to control and see things from afar, which is quite useful, you know, for all sorts of situations.
This approach to monitoring is, in a way, a bit like getting something "on the house" at your favorite spot – it means no direct cost to you for the core tools. We are talking about solutions that do not ask for payment, which is different from commercial services that might come with a price tag. The idea here is to use open-source options and clever setups that let you build your own system, pretty much from scratch, without needing to open your wallet for software licenses or subscription fees.
So, if you have a Raspberry Pi sitting around, or are thinking about getting one, this guide will walk you through making it a central part of your very own smart monitoring system. It's a chance to learn something new, to be sure, and to feel good about building something useful that gives you information when and where you need it. This whole process is more about your time and creative effort than it is about money, which is a nice change, isn't it?
Table of Contents
- What Does "Free" Really Mean Here?
- Why Monitor Your Raspberry Pi Remotely?
- Getting Started: What You'll Need
- Choosing Your Free Monitoring Platform
- Setting Up Your Raspberry Pi for Monitoring
- Collecting and Sending Data
- Visualizing Your Data: Building a Dashboard
- Staying Secure with Your Setup
- Troubleshooting Common Issues
- People Also Ask (FAQ)
- Conclusion
What Does "Free" Really Mean Here?
When we talk about "free remote IoT monitoring Raspberry Pi," it's worth taking a moment to think about what "free" truly signifies. It's not like someone is just handing you a complete, ready-to-go system without any effort on your part. That would be more like "free beer," as some might say, meaning it costs nothing in terms of money or effort. What we are discussing here is more akin to "free speech," where the core components or tools are available without monetary charge, but you put in the time and thought to make it work.
You see, the phrase "for free" can sometimes be informal, but it does mean without cost or payment, as in "these professionals were giving their time for free." In our context, the software platforms, programming languages, and many community resources are given for free. This means you won't get a bill for using them, which is a great benefit, honestly. It allows many people to get started without a big financial outlay.
So, while the monetary cost is absent, there is an investment of your personal time and a little bit of learning. You might spend some time figuring out how things connect, or how to write a few lines of code. This kind of "free" is about the absence of a price tag on the tools themselves, letting you build something valuable with your own effort. It's a wonderful arrangement for those who like to tinker and learn.
- Teach Me First Comic Free
- Wasmo Telegram Link 2025
- V3 Vegamovies.bitbucket.io
- Onlyfans Leaks Lia Engel
- Anjali Arora Viral Video
Why Monitor Your Raspberry Pi Remotely?
Having the ability to check on your Raspberry Pi projects from anywhere is, you know, a pretty big deal. It means you are not tied to being right next to your device to see what it's doing. Maybe you have a sensor in your attic checking the temperature, or a camera watching your 3D printer. Being able to see that data or view that feed on your phone or computer, even when you are away from home, offers a lot of comfort and control.
One very clear benefit is getting alerts. If your plant's soil gets too dry, or if a specific temperature threshold is crossed, your system can let you know. This kind of immediate information means you can react quickly, perhaps preventing a problem before it gets too big. It's like having a helpful assistant always keeping an eye on things for you, which is nice.
Another good reason is data collection. Maybe you want to track how often your cat uses its automatic feeder, or see how humidity changes throughout the day in your greenhouse. Remote monitoring helps you gather this information over time, letting you spot trends or understand patterns. This data can be very helpful for making decisions or just satisfying your curiosity, too. It gives you a broader view of what's happening.
It also opens up possibilities for automation. Once you can monitor something, you can then often use that information to trigger other actions. If the temperature goes too high, maybe your system automatically turns on a fan. This moves beyond just watching to actually making your environment smarter and more responsive, which is a big step. It’s a pretty neat way to get things done without having to be there.
Getting Started: What You'll Need
To get your free remote IoT monitoring system up and running with a Raspberry Pi, you'll need a few bits and pieces. Nothing too fancy, but having these items ready makes the whole process smoother. It’s like gathering your ingredients before you start cooking, so you have everything at hand.
The Heart of It All: Your Raspberry Pi
You'll need a Raspberry Pi, of course. Any recent model, like a Raspberry Pi 3 B+, 4, or even a Zero 2 W, will do the trick. The Pi acts as the small computer that collects data and sends it out. It's a surprisingly powerful little device for its size, capable of handling quite a bit of work, you know. Make sure it has Wi-Fi built-in or a Wi-Fi dongle if it's an older model without it.
You'll also need a power supply for your Pi. It’s important to use one that provides enough power, usually 5V with at least 2.5A for most models. A good quality power supply helps keep your Pi running steadily, which is important for continuous monitoring. A reliable power source means fewer unexpected shutdowns, so that's a good thing.
And, you'll need a microSD card. This card holds the operating system and all your programs. A 16GB or 32GB card, speed class 10 or higher, is generally a good choice. It’s where your Pi stores everything it needs to operate, so a decent one is helpful for performance.
Sensing the World: Sensors and Components
What do you want to monitor? This question will guide your choice of sensors. If you want to check temperature and humidity, a DHT11 or DHT22 sensor is a common and easy-to-use option. For light levels, a photoresistor or a dedicated light sensor works well. You might want to monitor motion with a PIR sensor, or perhaps even air quality with a gas sensor. There are so many kinds, really.
These sensors connect to the GPIO (General Purpose Input/Output) pins on your Raspberry Pi. You might need some jumper wires to make these connections. Sometimes, a small breadboard can be useful for prototyping your sensor circuits before making them more permanent. It helps you test things out easily, which is quite handy.
Making Connections: Network and Power
For remote monitoring, your Raspberry Pi needs to connect to the internet. This usually means Wi-Fi, which most modern Pis have built-in. Make sure your Wi-Fi network is stable where your Pi will be located. A strong and consistent connection is key for sending data reliably, you see.
Beyond the Pi's own power supply, if you're using many sensors or other components, you might need a separate power source for them. Sometimes, the Pi's GPIO pins can supply a small amount of power, but for anything more demanding, a dedicated supply or a power module is a safer bet. This ensures everything gets the energy it needs without straining your Pi.
Choosing Your Free Monitoring Platform
The "free" part of "free remote IoT monitoring Raspberry Pi" often comes down to the software platform you pick. There are several excellent choices that won't cost you a dime, each with its own strengths. It's a bit like choosing the right tool for a specific job, so you want one that fits your needs best.
Local Dashboards for Quick Looks
For a very simple setup, you could run a basic web server directly on your Raspberry Pi. This lets you access a dashboard from any device on your local network. Tools like Flask or Node.js can help you create a simple interface to show your sensor data. This is a good starting point if you just want to see things at home, you know, without needing outside access.
This method is very direct and gives you complete control over your data, as it never leaves your local network. It's also quite quick to set up for basic needs. The main thing is that you can only check on your data when you are connected to the same network as your Pi, so it's not truly "remote" in the sense of being anywhere in the world.
Cloud-Based Free Tiers for Anywhere Access
Many IoT platforms offer free tiers that are perfect for hobbyists and small projects. These platforms let your Raspberry Pi send data to their servers, and then you can view it through a web browser or a mobile app from anywhere with an internet connection. This is where the "remote" part really shines. Services like Adafruit IO, Ubidots, or Thingspeak often have generous free limits that work well for personal use, which is pretty handy.
These platforms typically handle the data storage and visualization for you, making it easier to get a nice-looking dashboard without a lot of coding. You just need to configure your Raspberry Pi to send data to them. It's a convenient way to get started with remote access, as they handle a lot of the backend work, you see.
Self-Hosted Open-Source Solutions
If you prefer to keep all your data and control within your own setup, self-hosting an open-source platform on your Raspberry Pi (or another local server) is a great option. This gives you the most flexibility and privacy. Tools like Grafana combined with InfluxDB, or even a community edition of ThingsBoard, can be installed directly on your Pi. This means you own all your data, which is a big plus for some people.
Setting these up might take a little more technical know-how, but there are plenty of guides and community support available. For instance, Grafana is a very popular choice for creating custom dashboards, letting you display your data in many different ways. It’s quite powerful once you get the hang of it, and it's free to use the core software, too. Learn more about our IoT projects on our site, which often use these kinds of tools.
Setting Up Your Raspberry Pi for Monitoring
Getting your Raspberry Pi ready is the first practical step. It involves a few basic procedures to get the operating system installed and your hardware connected. It's a bit like preparing a workspace before you start a project, making sure everything is in its place.
Getting the OS Ready
You'll need to install an operating system on your microSD card. Raspberry Pi OS (formerly Raspbian) is the standard choice, and it works very well. You can use the Raspberry Pi Imager tool on your computer to easily flash the OS onto the card. It's a straightforward process that gets your Pi ready to run, you know, so it's a good place to start.
Once the OS is on the card, insert it into your Raspberry Pi. Connect a monitor, keyboard, and mouse for the initial setup, or enable SSH for a headless setup (meaning no monitor needed). SSH is very convenient for remote access even before your monitoring system is fully built, allowing you to control your Pi from another computer.
Connecting Your Sensors
This is where your physical setup comes in. Carefully connect your chosen sensors to the appropriate GPIO pins on your Raspberry Pi. Make sure you follow a wiring diagram for your specific sensor, as incorrect wiring can damage the sensor or even your Pi. It’s important to be precise here, as a matter of fact.
Many sensors have just a few pins: power (VCC), ground (GND), and data. Double-check that you're connecting them to the correct voltage (usually 3.3V or 5V from the Pi) and ground pins. A little care here goes a long way to prevent problems down the line.
Network Preparation
Your Raspberry Pi needs to be connected to your Wi-Fi network to send data remotely. During the initial setup of Raspberry Pi OS, you can configure the Wi-Fi settings. If you're doing a headless setup, you can pre-configure Wi-Fi settings on the microSD card before booting the Pi for the first time. This makes it connect automatically when it powers on, which is quite helpful.
It's also a good idea to assign a static IP address to your Raspberry Pi on your local network. This means its IP address won't change, making it easier to connect to it consistently. You can usually do this in your router's settings or by configuring the network settings on the Pi itself. A stable network connection is, like, pretty essential for continuous monitoring.
Collecting and Sending Data
Once your Raspberry Pi is set up and your sensors are connected, the next step is to write the code that will read data from those sensors and send it to your chosen monitoring platform. This is where your Pi becomes truly active in the monitoring process.
Writing the Code: A Little Python Magic
Python is the go-to language for Raspberry Pi projects, and for good reason. It's relatively easy to learn, and there are many libraries available that make it simple to interact with various sensors. You'll write a small Python script that does a few things: it reads the sensor data, perhaps processes it a little (like converting units), and then prepares it to be sent. It's quite versatile, actually.
For example, if you're using a DHT11 temperature sensor, there's a Python library that lets you read its values with just a few lines of code. You can then write a loop in your script that reads the data every few minutes or seconds, depending on how often you want to monitor. This kind of regular reading is important for getting a good picture of changes over time.
Data Transmission: MQTT and HTTP
How does your Raspberry Pi send data to the remote platform? Two common ways are MQTT and HTTP. MQTT is a lightweight messaging protocol that's very efficient for IoT devices, especially when you have many devices sending small bits of data. Many free IoT platforms support MQTT, and there are Python libraries like Paho MQTT that make it easy to send messages. It's a pretty good choice for consistent updates.
HTTP is another option, where your Pi makes a web request (like visiting a web page) to send data. This is often used with REST APIs provided by cloud platforms. You'd format your sensor data into a specific structure, then send it as part of an HTTP POST request. Both methods work well; the choice often depends on what your chosen monitoring platform prefers. You can find examples for both online, which is very helpful.
You'll also want to make sure your Python script runs continuously, even if the Pi reboots. Tools like `cron` (for scheduled tasks) or `systemd` (for managing services) can be used to set up your script to start automatically when the Raspberry Pi powers on. This ensures your monitoring is always active, which is what you want for a reliable system.
Visualizing Your Data: Building a Dashboard
Seeing your data clearly is what makes remote monitoring truly useful. A good dashboard turns raw numbers into easy-to-understand graphs, charts, and indicators. It's like having a control panel for your project, giving you a quick overview of everything. This is where your chosen platform really shines, you know.
Setting Up Grafana or ThingsBoard
If you've chosen a self-hosted solution like Grafana, you'll install it on your Raspberry Pi or another server. Grafana connects to a data source, such as InfluxDB (which you'd also install), where your sensor data is stored. You then create a new dashboard in Grafana's web interface. It’s a pretty intuitive process once you get the hang of it, honestly.
For ThingsBoard, whether it's a cloud-based free tier or a self-hosted community edition, you'll create "devices" that represent your Raspberry Pi and its sensors. You then configure "dashboards" and "widgets" to display the data coming from those devices. ThingsBoard offers a lot of pre-built widgets that make it easy to show data in different ways, which is a nice feature.
Making Your Dashboard Your Own
The beauty of these platforms is how much you can customize your dashboard. You can choose different types of visualizations: line graphs to show trends over time, gauges for current values, or even tables. You can arrange them on the screen in a way that makes sense to you. It's about making the information as clear and useful as possible, you see.
You can also set up alerts within these dashboards. For example, if the temperature goes above a certain point, the dashboard can change color, or you can receive an email notification. This proactive monitoring is a very powerful aspect of these systems, letting you know when something needs your attention. It’s quite reassuring to have that kind of heads-up.
Staying Secure with Your Setup
While the "free" aspect is great, it's really important to keep security in mind, especially when your Raspberry Pi is connected to the internet. You want to protect your data and your device from unwanted access. It's a bit like locking your front door, so you want to be careful.
Always change the default password on your Raspberry Pi immediately after installation. The default username is usually "pi" and the password is "raspberry." Keeping these default credentials is a big security risk. Pick a strong, unique password that's hard to guess. This is a very basic but very important step.
If you are opening ports on your router to access your Pi directly from outside your network, be very cautious. It's generally better to use a secure cloud platform that handles the external access for you, or to use a VPN. If you must open ports, make sure they are only for necessary services

Free Remote Iot Platform For Raspberry Pi The Ultimate Guide Mastering
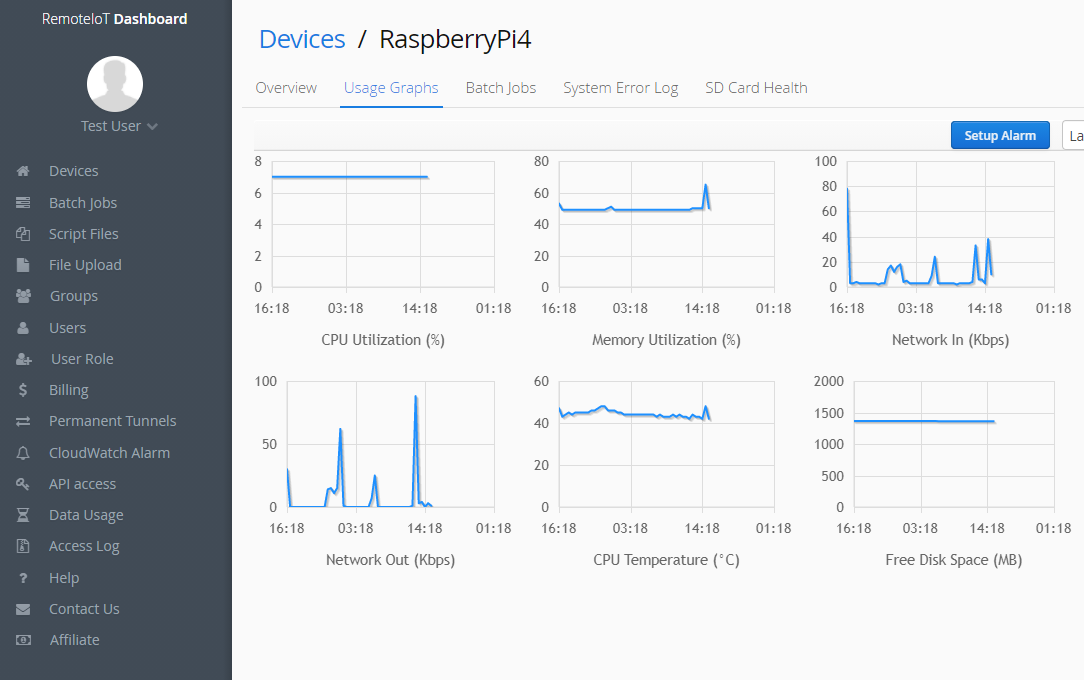
Monitor the CPU temperature of Raspberry Pi with RemoteIoT platform

Remote IoT Monitoring With Raspberry Pi: The Ultimate Guide
