Setting Up A Raspberry Pi VPC Network Example For Your Home Or Lab
You know, the idea of having your own private, separated network, much like what big companies use in the cloud, is something many of us might think is out of reach. Yet, with a Raspberry Pi, that kind of advanced setup becomes incredibly accessible and affordable for everybody. It is, in a way, a wonderful way to bring powerful computing concepts right to your kitchen table or classroom.
So, whether you are a seasoned tinkerer, a classroom coder, or just someone curious about how networks work, building a sort of "virtual private cloud" environment with these tiny computers is actually a very practical project. It lets you experiment with network isolation, security, and even different services without messing with your main home network. This kind of hands-on learning, pretty much, helps you get a real feel for how things connect.
This article will show you how to create your own Raspberry Pi projects, a secure and isolated network using a few Raspberry Pi devices. We will look at why you might want one and how to get it going, giving you a clear coding for kids, step-by-step guide to a Raspberry Pi VPC network example. It is all about making computing something you can truly touch and build with.
- Wasmo Telegram Link 2025
- Faith Adanza
- How Much Does Patience Wolfe Make
- Prank Goes Wrong Manhwa
- Remoteiot Device Ssh
Table of Contents
- What a VPC Is (and Why Raspberry Pi Fits In)
- Why Consider a Raspberry Pi VPC Network Example?
- Components You Might Need
- Designing Your Raspberry Pi VPC Network Example
- Setting Up Your Raspberry Pi VPC Network Example: A Step-by-Step Approach
- Practical Uses for Your Raspberry Pi VPC Network Example
- Common Challenges and Helpful Advice
- Frequently Asked Questions
What a VPC Is (and Why Raspberry Pi Fits In)
So, a VPC, or Virtual Private Cloud, is basically a way to have a private, separated section of a public cloud. Think of it like renting a specific apartment building in a very big city; you get your own space, your own rules, and your own privacy within that larger city. This separation means your services and data are kept apart from others, which is pretty important for security and organization. It is, you know, a very common setup in professional IT environments.
Now, bringing this idea down to a smaller scale, a Raspberry Pi VPC network example aims to create that same kind of isolation and control on your local network. Instead of big cloud servers, you are using tiny, powerful Raspberry Pi computers. These devices, as Raspberry Pi Holdings PLC makes computing affordable for everybody, are perfect for this. They let you build complex network setups without spending a lot of money, which is very much in line with making computing accessible.
It is, basically, about taking a concept usually found in huge data centers and shrinking it down to fit on your desk. You get to play with network structures, security rules, and different services, all within your own controlled bubble. This kind of project, in some respects, truly shows how versatile these little computers are, helping you learn programming through fun, practical projects.
Why Consider a Raspberry Pi VPC Network Example?
There are several good reasons why you might want to set up a network like this with your Raspberry Pis. First off, security is a big one. If you have, say, a smart home device or an experimental server that you are not quite sure about, you probably do not want it directly on your main home network. A separate Raspberry Pi VPC network example can keep those things isolated, so if something goes wrong, it does not affect your other devices. This is, you know, a pretty smart move for keeping your home network safe.
Another reason is for learning and practice. Raspberry Pi computers are tiny and affordable, and they are great for learning programming. Building a network like this gives you hands-on experience with networking concepts, firewall rules, and even setting up virtual private networks (VPNs). It is a practical project that helps young people, and even adults, realize their full potential through the power of computing. You get to create, test, and troubleshoot in a safe environment, which is very helpful for building skills.
Also, if you are working on different projects that need their own dedicated network space, this setup is perfect. Maybe you have one Pi running a home automation system, another for a media server, and a third for trying out new software. Giving each of them their own network segment means they do not interfere with each other, and you can manage them more easily. This sort of isolation, you know, keeps things tidy and running smoothly.
Finally, it is just plain fun. For the kitchen table tinkerer, there is a lot of satisfaction in building something complex and seeing it work. It is a way to join the global Raspberry Pi community, sharing what you have learned and built. This kind of physical computing project, actually, can be very rewarding, and you might even discover new ways to use your Pis, like capturing plant health with NDVI and Raspberry Pi.
Components You Might Need
To get your Raspberry Pi VPC network example going, you will need a few key pieces of equipment. Obviously, you will need at least two Raspberry Pi devices, but having three or more will let you build a more interesting and realistic network. These could be any model, from the older ones to the latest versions, depending on what you have available or what you want to buy. They are, you know, very versatile little machines.
Next up, you will need a network switch. This is what connects all your Raspberry Pis together. If you want to create truly separate network segments, a "managed" switch that supports VLANs (Virtual Local Area Networks) is a really good idea. If you do not have one, a basic unmanaged switch will still work, but you will rely more on software on the Pis themselves for isolation. You will also need network cables, usually Ethernet cables, to connect everything.
For each Raspberry Pi, you will need an SD card. This is where the operating system and all your project files live. Make sure you get cards that have enough space and are fast enough for good performance. You will also need a power supply for each Pi, as they need their own source of electricity to run. It is, more or less, the basic stuff for any Raspberry Pi project.
On the software side, you will be using Raspberry Pi OS, which is the official operating system. You might also need tools for network configuration, like `iptables` for firewall rules, or software for setting up a VPN server if you want to route traffic securely between your isolated segments. All of this, you know, can be downloaded and installed for free, which is pretty great.
Designing Your Raspberry Pi VPC Network Example
Before you start plugging things in, it is a really good idea to plan out your Raspberry Pi VPC network example. This means drawing a simple diagram of how your Pis will connect and what their roles will be. Think about what you want to achieve with your isolated network. Do you want completely separate segments for different types of devices, or just a single isolated zone? This initial thought process, basically, saves you a lot of headaches later on.
One common setup involves having one Raspberry Pi act as a central "gateway" or "router" for your isolated network. This Pi would connect to your main home network and also manage traffic for your internal, private Raspberry Pi network. The other Pis would then connect only to this gateway Pi, effectively being "inside" your private cloud. This kind of layout, you know, gives you a central point of control.
Consider what services each Pi will run. One might be a web server, another a database, and perhaps a third for some custom IoT project. Knowing this helps you decide how much isolation each needs and how they should communicate. It is, pretty much, like planning out different rooms in a house, where each room has a specific purpose and might need different levels of access.
Basic Network Layout Ideas
A simple layout for your Raspberry Pi VPC network example might look like this: you have one Raspberry Pi, let us call it Pi-Gateway, connected to your home router. This Pi-Gateway then connects to a separate network switch. All your other Raspberry Pis, let us call them Pi-A, Pi-B, and so on, connect only to this separate switch. This setup, you know, immediately creates a distinct network space.
In this arrangement, Pi-Gateway would be responsible for letting traffic from Pi-A or Pi-B go out to the internet, but it would also stop any traffic from your main home network from directly reaching Pi-A or Pi-B. It acts like a doorman, letting only authorized traffic through. This kind of arrangement, in a way, provides a good level of separation for your projects.
You could also have multiple isolated segments. For example, if you have a managed switch, you could set up different VLANs. Pi-A might be in VLAN 10, Pi-B in VLAN 20, and they would not be able to talk to each other directly, even though they are on the same physical switch. This is, you know, a bit more advanced but offers even greater isolation for your Raspberry Pi VPC network example.
Planning Your IP Addresses
When setting up your Raspberry Pi VPC network example, you will need to choose a range of IP addresses for your isolated network that does not conflict with your main home network. For example, if your home network uses IP addresses starting with 192.168.1.x, you might choose 10.0.0.x for your Raspberry Pi private network. This separation, you know, is really important to prevent network conflicts.
Assigning static IP addresses to each Raspberry Pi within your isolated network is generally a good idea. This means each Pi will always have the same address, which makes it much easier to manage and connect to them. For your Pi-Gateway, it will need two IP addresses: one for your home network connection and one for your isolated Raspberry Pi network. This dual role, obviously, is central to its function.
You will also need to decide on subnet masks. For most home lab setups, a /24 subnet mask (like 255.255.255.0) is perfectly fine, allowing for about 250 devices in that segment. This planning step, basically, lays the groundwork for all your network connections and ensures everything can talk to what it needs to, and nothing else.
Network Separation
Achieving true network separation for your Raspberry Pi VPC network example means making sure traffic from one segment cannot easily cross into another without explicit permission. There are a couple of ways to do this. One way, as mentioned, is using a managed network switch with VLANs. VLANs virtually separate ports on the switch, so even if Pis are physically connected to the same switch, they are logically on different networks. This is, you know, a very effective method.
If you do not have a managed switch, you can use firewall rules directly on your Raspberry Pis, especially on your Pi-Gateway. Tools like `iptables` on Linux allow you to define very specific rules about what kind of network traffic is allowed in or out of a particular Pi. You can set rules to drop all traffic coming from your main home network that is trying to reach your isolated Pis directly, forcing it to go through the Pi-Gateway. This approach, actually, gives you a lot of control over the flow of information.
The goal is to create boundaries. Think of it like putting up walls in your network. You want to make sure that the activities in your experimental Raspberry Pi VPC network example do not accidentally affect the reliability or security of your main home network. This careful separation, essentially, makes your home lab a safe place to try out new things.
Setting Up Your Raspberry Pi VPC Network Example: A Step-by-Step Approach
Now, let us get down to the actual work of setting up your Raspberry Pi VPC network example. This will involve preparing your Pis, configuring their network connections, and then putting in place the rules that create your isolated environment. It is a process that builds up, step by step, so take your time with each part. This is, you know, where the fun really begins.
Getting Your Raspberry Pis Ready
First, you need to get Raspberry Pi OS onto each of your Raspberry Pi devices. You can use the Raspberry Pi Imager tool, which is available for free, to easily write the operating system onto your SD cards. Once the OS is on the card, put it into your Pi, connect a monitor, keyboard, and mouse (or set it up for "headless" operation if you prefer), and power it on. This is, basically, the very first step for any Pi project.
After the initial boot, make sure to update all the software packages on each Pi. You can do this by opening a terminal and running `sudo apt update` followed by `sudo apt full-upgrade`. This ensures you have the latest versions of everything, which is pretty important for security and stability. As of 2024, keeping packages updated is a pretty straightforward process, and it helps things run smoothly, especially with new releases like the Trixie repo updates that allow updating a Bookworm image to Trixie.
Also, it is a good idea to change the default password for the 'pi' user on each device. This is a basic security measure that you should always do. You can use the `raspi-config` tool for this, or just the `passwd` command in the terminal. These initial setup steps, you know, lay a solid foundation for your Raspberry Pi VPC network example.
Setting Up Network Connections
For your Raspberry Pi VPC network example, you will want to set static IP addresses for the network interfaces on your Pis. This means they will always have the same IP address, making them easier to find and manage within your isolated network. You can edit the `/etc/dhcpcd.conf` file on each Pi to set these static IPs. For example, you might set Pi-A to 10.0.0.10 and Pi-B to 10.0.0.20.
Your Pi-Gateway will need two network configurations. One will connect to your main home network, likely getting an IP address automatically from your home router. The other will be for your isolated network, with a static IP address like 10.0.0.1. This dual setup, you know, lets it bridge the two networks. Make sure the subnets for these two connections are different, so they do not overlap.
After making changes to network configuration files, you will need to restart the networking service or reboot the Raspberry Pi for the changes to take effect. It is a good practice to test connectivity after each change to make sure everything is working as expected. You can use the `ip a` command to check the assigned IP addresses and `ping` to test if Pis can reach each other.
Making Network Separation Happen
This is where the "private" part of your Raspberry Pi VPC network example really comes into play. If you have a managed switch, you can configure VLANs. This involves logging into your switch's management interface and assigning specific ports to different VLAN IDs. For example, ports connected to Pi-A and Pi-B might be in VLAN 10, while the port connected to Pi-Gateway might be a "trunk" port carrying traffic for multiple VLANs. This physical separation, you know, is very strong.
If you are relying on software, you will use `iptables` on your Pi-Gateway. You can set up rules to forward traffic from your isolated network (10.0.0.x) out to the internet, but block any incoming connections from your main home network that are not specifically requested by your isolated Pis. This means your isolated Pis can access the internet, but devices on your main network cannot directly initiate connections to them. This kind of filtering, essentially, builds a protective wall.
You can also use `iptables` to control traffic *between* your isolated Pis if you want further segmentation without VLANs. For instance, you could prevent Pi-A from talking to Pi-B directly, forcing all traffic through the Pi-Gateway for inspection or logging. This level of control, obviously, gives you a lot of flexibility in how your network operates.
Building a Central Gateway Pi
Your Pi-Gateway is the heart of your Raspberry Pi VPC network example. It will need to have IP forwarding enabled, which tells the Pi to act like a router and pass traffic between its two network interfaces. You can enable this by editing the `/etc/sysctl.conf` file and uncommenting the line `net.ipv4.ip_forward=1`. After saving, run `sudo sysctl -p` to apply the change.
This Pi will also run your `iptables` rules for network address translation (NAT) and firewalling. NAT is what allows multiple devices on your isolated network to share a single public IP address when accessing the internet through your main router. The firewall rules, as mentioned, will define what traffic is allowed to pass between your isolated network and your main network. This setup, you know, makes the Pi-Gateway a very busy little computer.
You might also consider running a DNS server on your Pi-Gateway, like Pi-hole, which can also block ads and provide DNS resolution for your isolated network. This adds another layer of control and utility to your Raspberry Pi VPC network example. It is, basically, about centralizing services and security.
Hooking Up Your "Workhorse" Pis
Once your Pi-Gateway is set up, connect your other Raspberry Pis (Pi-A, Pi-B, etc.) to the dedicated network switch that is connected to your Pi-Gateway. Configure their network settings to use static IP addresses within your isolated 10.0.0.x range. Crucially, their default gateway should be the IP address of your Pi-Gateway (e.g., 10.0.0.1).
This tells them that if they want to reach anything outside their immediate 10.0.0.x network, they must send that traffic to the Pi-Gateway. This is, in a way, how they get out to the internet or communicate with other networks. Their DNS server should also point to your Pi-Gateway, or a public DNS server if you prefer not to run one on your gateway.
Make sure that these "workhorse" Pis do not have any direct connection to your main home network. They should only connect to the network switch that is part of your isolated Raspberry Pi VPC network example. This physical separation, you know, is a key part of maintaining the isolation you are aiming for.
Checking Your Work
After everything is connected and configured, it is time to test your Raspberry Pi VPC network example. From one of your isolated Pis (e.g., Pi-A), try to ping an address on the internet, like `ping google.com`. If that works, it means your Pi-Gateway is correctly forwarding traffic out to the internet. This is, obviously, a good sign.
Next, try to ping Pi-B from Pi-A. If they can communicate, your internal isolated network is working. Then, try to ping Pi-A from a computer on your main home network. This should *not* work, or at least it should be blocked by your Pi-Gateway's firewall rules. If it fails, your isolation is working as intended. This kind of testing, you know, confirms your setup.
You can also try to access services running on your isolated Pis. For example, if Pi-A is running a web server, try to access it from Pi-B, and then try to access it from your main home network (which should fail). These tests, basically, verify that your network is behaving exactly as you planned, keeping things separate and secure.
Practical Uses for Your Raspberry Pi VPC Network Example
Once you have your Raspberry Pi VPC network example up and running, a whole world of possibilities opens up. For starters, it
- Anjali Arora Viral Video
- Viralkandcom
- Viralkamd
- Faith Adanza Porn
- Pinay Scandal News 2024 Philippines
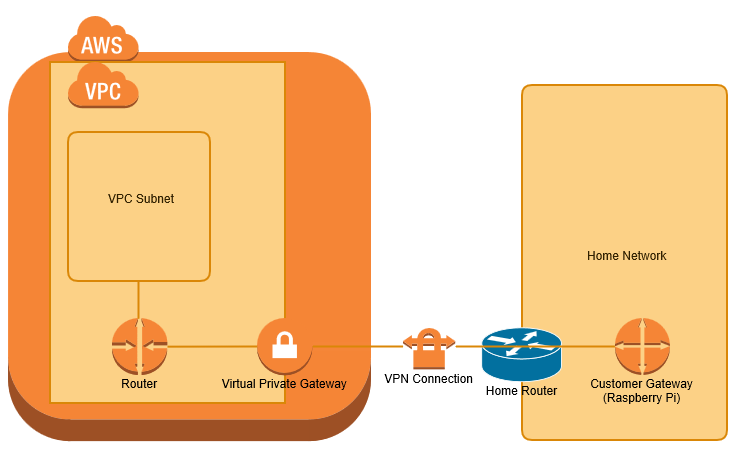
VPN bridge from home network to AWS VPC with Raspberry Pi – COSOSO

Discover The Ultimate Guide To The Best RemoteIoT VPC Network Raspberry Pi

Remote IoT VPC Network Raspberry Pi: Transforming Connectivity
