Getting Your Remote IoT Behind Router: Simple Steps For Accessing Devices
Do you have smart gadgets at home, like a camera or a temperature sensor, that you wish you could check on when you are away? You might find it tough to get to these devices because your home internet router is, in a way, keeping them safe inside your network. This situation, often called needing to access your remote IoT behind router, is a really common puzzle for many people who love their tech. So, we are going to look at how you can make this happen, giving you control over your smart things from just about anywhere.
It's like your router is a helpful doorman for your home network, letting in only the connections you want and keeping others out for safety reasons. This is usually a very good thing, as a matter of fact, it helps protect your personal stuff from unwanted visitors. But, when you want to reach your own IoT devices from the outside world, this protective feature can feel a bit like a barrier.
This article will help you figure out how to manage your IoT devices that are sitting behind your router. We will talk about ways to set things up so you can check on your devices, maybe even using something like a Raspberry Pi, and perhaps without spending extra money. It's about careful planning and execution, you know, to make sure everything works just right.
Table of Contents
- What's the Deal with Remote IoT Behind a Router?
- Ways to Get Your Remote IoT Behind a Router Working
- Setting Up Remote IoT with Raspberry Pi (Cost-Free Options)
- Keeping Your Remote IoT Setup Safe and Sound
- Common Questions About Remote IoT Behind a Router
What's the Deal with Remote IoT Behind a Router?
You might wonder why it's a big deal to access your smart things from afar. Well, your home network is set up in a particular way, and that way often makes it a bit of a challenge to reach devices that are sitting inside it from the outside internet. It's like having a house with a very secure front door, which is good for keeping things safe, but also means you can't just walk in from the street without a key.
The Router as Your Home's Digital Gatekeeper
Your router really does act like a digital doorman. It manages all the internet traffic coming into and going out of your home. It uses something called Network Address Translation, or NAT, which basically lets many devices inside your home share one public internet address. This is how your phone, computer, and smart light bulbs can all be online at the same time using just one internet connection, so that is pretty neat.
This doorman is very good at its job, keeping outside connections out for safety reasons. It sees incoming requests and, unless it knows exactly where to send them inside your home, it just drops them. This is why you cannot directly connect to your IoT device from the internet if it is behind this NAT router and firewall, as a matter of fact.
- Pinay Scandal News 2024 Philippines
- How Much Does Patience Wolfe Make
- Best Remoteiot Device Platforms
- Teach Me First Comic Free
- Viralkamd
Why Remote Access Can Be a Bit Tricky
Because of this protective setup, IoT devices that are installed behind a NAT router and firewall cannot usually be accessed from the internet directly. This is a design choice for security, and it's a good one, but it does create a hurdle for remote control. You want to check your smart thermostat from work, for example, but your router is saying "no entry" to that outside request. It's a common problem, so many people face this.
The trick is finding a way to tell your router, or to create a special path, that lets you get to your specific IoT device without opening up your whole home network to everyone. We want to be able to get to our smart devices, but we still want to keep our home network secure, you know, that is the goal.
Ways to Get Your Remote IoT Behind a Router Working
There are a few different ways to tackle the puzzle of accessing your remote IoT behind router. Each method has its own set of steps and considerations, and some might be a better fit for your situation than others. We are going to walk through some of the very best ways to set up this kind of access, actually.
Method 1: Port Forwarding – Opening a Specific Door
Port forwarding is like telling your router to open a specific door for a specific purpose. You tell your router that any incoming request on a certain "port" should be sent directly to a particular device inside your network. This is a common way to get remote SSH access for your IoT devices, for example.
To do this, you usually log into your router's settings through a web browser. You find the "Port Forwarding" section, then you tell it which external port to listen on, which internal IP address (your IoT device's address) to send it to, and which internal port that device is using. It's a direct route, more or less, and it works for many simple setups.
However, port forwarding can be a bit of a security concern if not done carefully. You are opening a door, so you want to make sure only authorized people can come through. It also requires your home's public IP address to be stable, or you need to use a dynamic DNS service, which is another layer to consider.
Method 2: VPNs – Creating a Secure Tunnel
Using a Virtual Private Network, or VPN, is like creating a secret, secure tunnel directly into your home network. Instead of opening a door, you are building a private road that only you can use. This means all your traffic goes through this secure tunnel, making it very safe, which is good.
You can set up a VPN server on a device inside your home network, perhaps even on a Raspberry Pi, or some routers have built-in VPN server capabilities. When you want to access your IoT devices, you connect to this VPN server from your phone or computer outside your home. Once connected, your device acts as if it's actually inside your home network, giving you full access to your IoT gadgets.
This method is generally seen as more secure than port forwarding because it doesn't leave an open port for everyone to see. It does require a bit more setup, and you need to make sure your VPN server is properly configured for security. But, it's a really good way to keep things private.
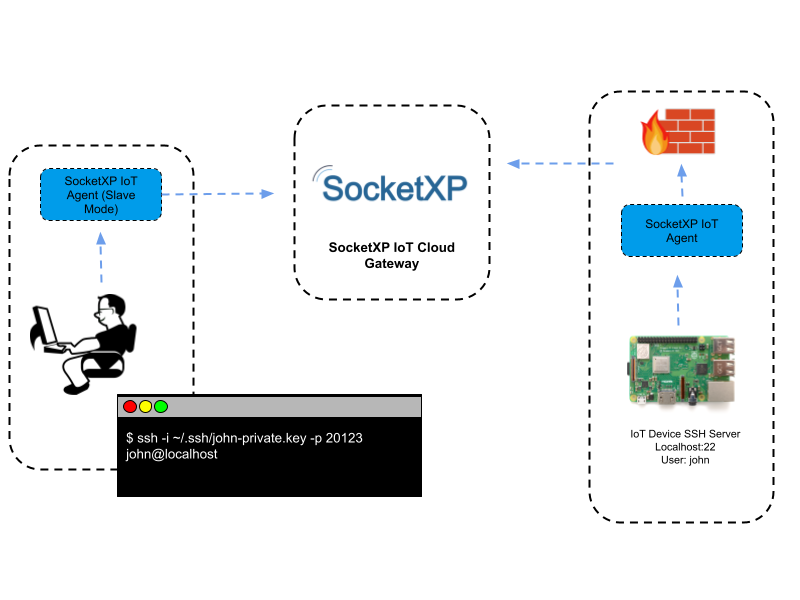
Method 3: Cloud-Based Solutions (Like SocketXP) – Letting Someone Else Handle the Door
For many people, setting up port forwarding or a VPN can feel a bit too technical. This is where cloud-based solutions come into play. These services offer a simpler way to get your remote IoT behind router. They act as an intermediary, helping your device connect out to their service, which then lets you connect in.
For instance, SocketXP's IoT remote access solution is a good example of this. Because IoT devices installed behind a NAT router and firewall cannot be accessed from the internet directly, SocketXP's IoT platform provides remote SSH access to IoT devices behind a NAT router or firewall over the internet. They do this using secure SSL/TLS VPN tunnels, so that is pretty convenient.
The remote IoT platform allows users to remotely control IoT devices using a web browser. It simplifies the process significantly, as you don't need to mess with router settings or complex VPN setups. The service handles the tricky parts of getting through the router's defenses, which can be a huge help for people who just want things to work.
Method 4: SSH Tunnels – Your Private Connection
SSH, or Secure Shell, is a way to securely connect to a computer over an unsecured network. You can use SSH to create a "tunnel" for your IoT device's traffic. This is particularly useful for remote SSH access for your IoT devices. It's a bit like creating a hidden passage through your router's wall, just for your data.
Here's a breakdown of the key elements and features that enable successful remote SSH access for your IoT devices. You typically need an always-on computer or a Raspberry Pi inside your network that you can SSH into. Then, from that device, you can forward traffic to your IoT gadget. This method is very secure, provided your SSH keys are kept safe, naturally.
It involves a bit more command-line work, but it offers a lot of control and security. It's a favorite among those who like to have very direct management over their network connections. You can use it to get to web interfaces on your IoT devices, or to send commands directly, and stuff like that.
Setting Up Remote IoT with Raspberry Pi (Cost-Free Options)
One of the most popular and cost-effective ways to set up a remote IoT system behind a router is by using a Raspberry Pi. This little computer is incredibly versatile and can act as a bridge or a server for your IoT needs, perhaps without any additional costs beyond the Pi itself. It's a really good option for many people, you know.
Why Raspberry Pi is a Good Choice
The Raspberry Pi is a tiny, affordable computer that can run 24/7 without using much power. This makes it perfect for acting as a dedicated hub for your remote IoT setup. You can install various software on it, like an SSH server, a VPN server, or even a client for cloud-based IoT platforms. It's quite flexible, actually, for many different projects.
Its small size means it doesn't take up much space, and its low cost means you can experiment without a big investment. For tech enthusiasts and professionals alike, unlocking the best remote IoT behind router Raspberry Pi for free has become an essential skill. It's a very popular platform for these kinds of projects, too it's almost a go-to device.
Steps for a Basic Raspberry Pi Setup
Getting your remote SSH IoT behind router tutorial setup working involves a few general steps, regardless of the method you choose. Here's a simplified look at how you might use a Raspberry Pi for this purpose:
- Get Your Raspberry Pi Ready: First, you need to install an operating system, like Raspberry Pi OS, onto an SD card and boot up your Pi. Make sure it's connected to your home network.
- Enable SSH: For remote access, you will almost certainly want to enable SSH on your Raspberry Pi. This lets you connect to it from another computer using a command line. You can do this through the Raspberry Pi's configuration settings.
- Choose Your Access Method:
- For Port Forwarding: If you choose this, you'd configure your router to forward a specific port to your Raspberry Pi's IP address. Then, you could SSH into the Pi from outside your network.
- For VPN Server: You could install a VPN server software, like OpenVPN or WireGuard, on your Raspberry Pi. This turns your Pi into a VPN gateway for your home network.
- For Cloud Client: Install the client software for a service like SocketXP on your Raspberry Pi. This client will establish a connection to the cloud platform, making your Pi and its connected devices accessible.
- Set a Static IP for Your Pi: It's a good idea to give your Raspberry Pi a static IP address within your home network. This way, its address won't change, making it easier for your router or other services to find it consistently, which is helpful.
- Test Your Connection: Once set up, try to access your Raspberry Pi or the IoT device connected through it from outside your home network. This confirms everything is working as it should, you know, that is pretty important.
By following these guidelines, you can create a secure and efficient IoT system tailored to your needs. This guide will explore the best practices, tools, and techniques for setting up a remote IoT system behind a router using Raspberry Pi without any additional costs. It helps you remotely manage IoT devices behind a router without incurring additional costs, which is a big plus for many people.
Keeping Your Remote IoT Setup Safe and Sound
When you open up your home network to remote access, even in a small way, security becomes very, very important. You want to make sure that only you, or people you trust, can get to your devices. This means taking a few extra steps to keep things locked down, as a matter of fact.
Security Tips for Your Devices
First, always change default passwords on your IoT devices and your Raspberry Pi. Default passwords are like leaving your front door wide open. Use strong, unique passwords for every device, and consider using a password manager to keep track of them. This is a basic step, but it's very important, apparently.
Keep your device software and firmware updated. Software updates often include security fixes that close loopholes attackers could use. Think of it like getting new, stronger locks for your doors. Regular updates are just good practice, you know, for keeping things safe.
If you are using SSH, consider using SSH keys instead of passwords for authentication. SSH keys are much more secure and harder to guess than even very strong passwords. It's a bit more setup initially, but it offers a much higher level of protection, seriously.
Router Security Basics
Your router is the first line of defense for your home network. Make sure its administrative password is also strong and unique. Don't leave it as the default, as a matter of fact, that is a common mistake. You should also check for firmware updates for your router regularly, as these can improve its security and performance.
If you are using port forwarding, be very specific about which ports you open and to which internal IP addresses. Only open the ports that are absolutely necessary for your IoT device to function. Close any ports you are not actively using. Less open doors means less opportunity for unwanted visitors, which is a good rule of thumb.
Also, consider enabling your router's firewall settings if they are not already active. A firewall adds an extra layer of protection by controlling incoming and outgoing network traffic. It's like having a security guard at your digital doorman, checking everyone who tries to enter or leave, you know, that is pretty helpful.
Common Questions About Remote IoT Behind a Router
People often have questions when they start thinking about accessing their remote IoT behind router. Here are a few common ones:
Can I access my IoT device without port forwarding?
Yes, you definitely can. Methods like using a VPN, cloud-based solutions such as SocketXP, or SSH tunnels can let you access your devices without directly opening ports on your router. These methods often create a more secure path, which is a big plus, actually.
Is it safe to access my IoT devices from outside my home network?
It can be very safe if you set things up correctly. Using strong passwords, keeping software updated, and employing secure methods like VPNs or SSH keys are important steps. It's all about making sure your connections are private and protected, you know, that is the main thing.
What if my internet service provider (ISP) uses CGNAT?
If your ISP uses Carrier-Grade NAT (CGNAT), it means you share a public IP address with other users, and you cannot use traditional port forwarding. In this case, cloud-based solutions like SocketXP or creating an outbound tunnel from a device inside your network are typically your best options. It's a bit of a hurdle, but there are still ways around it, fortunately.
Learn more about IoT security practices on our site. You can also link to this page for more Raspberry Pi projects.
Setting up remote IoT behind a router might seem like a bit of a technical challenge at first, but with the right approach, it is very much doable. Whether you choose to open a specific door with port forwarding, build a secure tunnel with a VPN, use a helpful cloud service, or create a private SSH connection, the goal is to have control over your smart things from wherever you are. By understanding the different methods and focusing on security, you can enjoy the convenience of managing your IoT devices remotely, which is really what it is all about.
Remember, careful planning and execution are key to a successful setup. Always prioritize the safety of your network and devices. With the right tools and a little bit of effort, your IoT devices can be just as accessible from afar as they are when you are right at home, and that is a pretty good feeling.
For more detailed information on network security, you might want to check out resources from reputable organizations, for example, the Cybersecurity and Infrastructure Security Agency (CISA). They offer a lot of good advice on keeping digital systems safe and sound.

How To Use Remote IoT Behind Router MAC Free: A Complete Guide

Best Remote IoT Setup Behind Router With Raspberry Pi
Remote IoT Behind Router Example Raspberry Pi: A Comprehensive Guide
