Unlock Your Raspberry Pi's Potential: Remote IoT VPC Network Free Options
Thinking about connecting your tiny Raspberry Pi projects to the wider world, perhaps from a cozy spot at home or even a distant coffee shop? It's a common desire, you know, to manage devices that are far away, much like how many folks these days handle their accounting or even offer bookkeeping services without ever stepping foot in an office. This idea of remote access, it’s a big deal, and for your IoT gadgets, it opens up a whole lot of possibilities.
Imagine being able to check on your home sensors, control smart lights, or gather data from a remote weather station, all without being physically there. That kind of freedom, it’s really something. But often, the thought of setting up secure, remote connections, especially those that resemble a Virtual Private Cloud (VPC) network, can feel a bit overwhelming, or perhaps expensive.
The good news, though, is that you don't always need a big budget or a complex IT setup to make this happen. We're going to explore how you can create a secure, remote IoT network for your Raspberry Pi, looking at options that are, well, free or at least very low cost. It's about finding clever ways to connect, you see, much like how communities come together to share tips on remote work or even coordinate remote raids in games like Pokémon Go.
Table of Contents
- What is Remote IoT and Why It Matters?
- Understanding VPC and Its Benefits for IoT
- Why "Free" Matters for Raspberry Pi Projects
- Exploring Free VPC-like Solutions for Your Raspberry Pi
- Setting Up Your Remote Raspberry Pi Network: A Basic Look
- Keeping Your Remote IoT Secure
- Real-World Uses and What You Can Build
- Common Challenges and How to Handle Them
What is Remote IoT and Why It Matters?
Remote IoT, in simple terms, is about managing and interacting with your "things" – your devices – from a distance. Think of it like streaming Xbox games via the cloud, you know, where you don't need the console right there to play. It's the same idea for your smart devices, whether they're monitoring temperatures in a greenhouse or controlling lights in your living room.
This capability is quite useful, honestly, for so many reasons. For hobbyists, it means you can tinker with projects even when you are away from home. For small businesses, it might mean keeping an eye on equipment in a distant location without having to travel. It gives you, perhaps, a level of control and flexibility that wasn't always possible, or at least not easily so.
The ability to work with devices remotely also mirrors the growing trend of remote work itself. Just as remote accounting positions are steadily growing, allowing people to offer services from anywhere, remote IoT lets your devices "work" from anywhere too. It’s all about extending your reach, you see, and making things happen without physical presence, which is pretty neat.
Understanding VPC and Its Benefits for IoT
A Virtual Private Cloud, or VPC, sounds a bit fancy, but it's basically like having your own private, isolated section within a larger cloud network. Think of it as a secure, walled-off area where only your devices and authorized users can communicate. This isolation, it's really important for security and organization, especially when you are dealing with many devices.
For IoT, a VPC offers several good things. First, it helps keep your devices safe from the wider internet, kind of like having a private room at a big party. This separation, it cuts down on the chances of unwanted visitors trying to get into your systems. It’s a big step in keeping your data and devices secure, which is, you know, always a top concern.
Second, a VPC gives you better control over how your devices talk to each other and to the internet. You can set up specific rules, almost like a traffic cop, to decide what kind of communication is allowed. This level of control, it helps manage network traffic and makes troubleshooting easier, too, if something goes wrong. It’s all about creating a tidy and secure digital space for your gadgets.
Why "Free" Matters for Raspberry Pi Projects
When you're working with Raspberry Pi, especially for personal projects or starting out, cost is often a big consideration. The Pi itself is quite affordable, so it makes sense to look for networking solutions that don't add a lot to the bill. This is where "free" options become very appealing, you know, for anyone who needs to build something without a huge investment.
Many folks, like those looking for remote jobs, might come across platforms that have a subscription model to access their services. For hobbyists and makers, this can be a hurdle. Finding free tools and methods for your remote IoT setup means you can experiment, learn, and even deploy small-scale projects without worrying about recurring fees. It lowers the barrier to entry, so to speak.
Also, using free options allows you to test different approaches and see what works best for your specific needs, without any financial pressure. It's a bit like a community sharing news, experience, and tips about working remotely; you get to try out different ideas without commitment. This flexibility, it’s really valuable for learning and innovation, allowing you to explore possibilities freely.
Exploring Free VPC-like Solutions for Your Raspberry Pi
Achieving a "VPC-like" setup for your Raspberry Pi without spending money might seem like a tall order, but there are several clever ways to do it. These methods might not be full-fledged cloud VPCs, but they offer similar benefits of secure, isolated remote access. We'll look at a few common and effective approaches that you can try, you know, to get your projects connected.
VPNs: Your Private Tunnel
One of the most popular ways to create a secure remote connection is by using a Virtual Private Network, or VPN. Think of a VPN as a private, encrypted tunnel through the public internet. Your Raspberry Pi can act as a VPN client, connecting to a VPN server, or even become the VPN server itself. This way, all traffic between your remote device and your home network travels securely, almost as if they were on the same local network, which is quite useful.
Open-source VPN software like OpenVPN or WireGuard are excellent choices here. You can set up a VPN server on a home router that supports it, or even on another Raspberry Pi or a spare computer that's always on. Then, your remote Raspberry Pi connects to this server. This creates a secure, private network segment for your IoT devices, and it’s completely free if you use your own hardware, so it’s a good option.
The benefit here is clear: all your remote IoT devices can communicate securely with your home network. This is really good for things like home automation, where you want to control devices securely from anywhere. It's a robust solution that gives you, you know, a lot of control over your network traffic and privacy, which is a big plus for many projects.
Ngrok and Similar Tunneling Services
For quick and easy remote access to specific services running on your Raspberry Pi, tools like Ngrok are a great choice. Ngrok creates a secure tunnel from a public URL to a service running on your local machine, even if your Raspberry Pi is behind a router with no special port forwarding. It’s very handy for testing or demonstrating a project, you know, without much setup fuss.
The free tier of Ngrok provides a temporary, public URL that points to your Raspberry Pi. This means you can expose a web server, an SSH port, or any other service to the internet without changing your router settings. It's not a full VPC, obviously, but it gives you that remote access capability for individual services. It’s quite useful for quick tasks, or for sharing something with others, like how people share news in remote work communities.
While Ngrok is convenient, remember that the free tunnels are temporary and the public URL changes each time you restart the tunnel. For more permanent solutions, you might need their paid tiers or a different approach. But for getting something up and running fast, or for a demonstration, it’s a really helpful tool, and it lets you see what’s possible with remote access, too.
Cloud Provider Free Tiers (with a twist)
Many big cloud providers, like Amazon Web Services (AWS) or Google Cloud Platform (GCP), offer free tiers that can be quite useful. While they won't give you a full, dedicated VPC for your Raspberry Pi directly, you can use their free tier virtual machines (VMs) to host a small VPN server or a proxy. This VM then acts as a secure gateway for your Raspberry Pi, giving you a VPC-like entry point, you know, into your remote network.
For instance, you could set up a tiny VM on AWS Free Tier, install an OpenVPN server on it, and then have your Raspberry Pi connect to that VPN server. This VM sits inside a VPC that the cloud provider manages, and you can configure its network rules. This effectively gives your Raspberry Pi a secure, private connection to a public cloud environment, which is pretty clever, actually.
The key here is to be mindful of the free tier limits. These are usually generous enough for a small VPN server or a lightweight proxy, but exceeding them can lead to charges. It's a good way to get a taste of cloud networking and use a real VPC, in a way, without the usual cost. You just need to keep an eye on your usage, you know, to stay within the free limits.
Self-Hosted Solutions: Tailoring Your Own
For those who like to build things from the ground up, self-hosting offers the ultimate control. This often involves using SSH tunneling, setting up custom proxies, or even creating a mesh network with tools like ZeroTier or Tailscale. These solutions allow you to connect your Raspberry Pi to other devices or servers directly, creating a private network over the internet, which is pretty neat.
SSH tunneling, for example, lets you forward ports securely from your Raspberry Pi to another machine. It’s a simple yet powerful way to access services remotely. Tools like ZeroTier or Tailscale create a virtual network overlay that connects your devices directly, no matter where they are, almost like they're all on the same local network. This is really good for creating a distributed system, you know, where all your devices can talk to each other.
These self-hosted options require a bit more technical know-how to set up, but they offer immense flexibility and are completely free, assuming you have the hardware. It’s about taking control of your network, you see, and tailoring it exactly to your needs. This approach resonates with the idea of sharing experiences and tips, much like what happens in communities dedicated to remote work solutions.
Setting Up Your Remote Raspberry Pi Network: A Basic Look
Getting your Raspberry Pi ready for remote access involves a few fundamental steps. First, you need to have a fresh installation of Raspberry Pi OS. Make sure it's updated, too, as that helps with security and stability. Then, you'll want to enable SSH, which is a secure way to access your Pi's command line from another computer. This is a very basic first step for any remote interaction, you know, with your device.
Next, you'll configure your chosen remote access method. If it's a VPN, you'll install the client software on your Pi and connect it to your VPN server. If it's Ngrok, you'll download their client and run the tunneling command. Each method has its own specific instructions, of course, but the general idea is to get your Pi to establish that secure connection to the outside world, or to your private network.
It's also a good idea to set up a static IP address for your Raspberry Pi on your local network, or at least a DHCP reservation. This makes it easier to find your Pi, especially if you're hosting services on it. Getting these foundational pieces in place, it makes the whole remote setup much smoother, you know, and less prone to unexpected issues.
Keeping Your Remote IoT Secure
Security is, arguably, the most important part of any remote setup, especially for IoT devices. Just like managing sensitive financial data remotely requires careful attention to security, so does connecting your Raspberry Pi to the internet. A good starting point is to change the default password on your Pi immediately. This is a simple step, but it makes a big difference, you see.
Regularly updating your Raspberry Pi's operating system and any installed software is also very important. These updates often include fixes for security vulnerabilities. Neglecting updates can leave your device open to attacks, and that's something you really want to avoid. It’s a bit like how some folks fight with support for months over issues that could have been prevented; staying updated helps prevent problems.
Consider setting up a firewall on your Raspberry Pi to control what kind of network traffic can reach it. Only open the ports that are absolutely necessary for your services to run. For instance, if you're only using SSH, only open port 22. This practice, it minimizes your device's exposure to potential threats. It's about being smart and cautious, you know, with what you put out there on the internet.
Also, if you're using a public cloud free tier, make sure to configure the security groups or firewall rules on the cloud side to restrict access only to necessary IP addresses or networks. This adds another layer of protection. Remember, a secure remote setup means peace of mind, and it's something you really should prioritize, you know, for any IoT project.
Real-World Uses and What You Can Build
With a remote IoT VPC network for your Raspberry Pi, the possibilities for what you can build are quite broad. Imagine setting up a home automation system that you can control from anywhere in the world. You could turn on lights, adjust thermostats, or even monitor security cameras, all from your phone. It gives you, you know, a constant connection to your living space.
Another common use is environmental monitoring. You could place a Raspberry Pi with sensors in a garden, a distant shed, or even a beehive, collecting data on temperature, humidity, or air quality. This data can then be sent to a cloud dashboard or a personal server, allowing you to track conditions over time without needing to visit the location physically. It's a powerful way to gather information, you see.
For those interested in data collection, a remote Raspberry Pi can act as an edge device, gathering information from various sources and sending it back to a central server for analysis. This could be anything from traffic counting to monitoring industrial equipment. It's like having a little data-gathering assistant out in the field, always connected and ready to send you insights, which is pretty cool.
You could even set up a personal cloud storage solution or a media server that you can access from anywhere. The flexibility of having remote access to your Pi means you're not limited by physical proximity. It's about enabling projects that might otherwise be impossible, or at least much harder, to manage. It truly opens up a world of possibilities for your creative ideas, you know.
Common Challenges and How to Handle Them
While setting up a remote IoT network for your Raspberry Pi can be rewarding, you might run into a few bumps along the way. One common challenge is dealing with dynamic IP addresses. Most home internet connections don't have a fixed public IP, meaning your IP address can change, making it harder to consistently connect to your Pi. This can be a bit annoying, you know, if you're trying to keep a constant link.
A good way to handle dynamic IPs is by using a Dynamic DNS (DDNS) service. These services link a static hostname (like "myiotpi.ddns.net") to your changing IP address. So, even if your IP changes, you can always reach your Pi using the same hostname. Many routers have built-in DDNS support, or you can run a small client on your Raspberry Pi itself. This makes things much simpler, you see, for maintaining access.
Another challenge can be connectivity drops or unexpected reboots. Sometimes, a remote device might lose its internet connection, or the Pi might freeze up. This is similar to how rebooting a computer can fix remote access issues, as mentioned in the text about troubleshooting. For these situations, consider implementing a watchdog timer or a script that automatically reboots the Pi if it loses connectivity. This helps keep your system running smoothly, you know, even when you're not there.
Troubleshooting can also be a bit tricky when you're not physically next to the device. Having good logging practices on your Raspberry Pi is essential. This means setting up your applications to record what they're doing, so you can check logs remotely to figure out what went wrong. It's about being prepared for issues, you see, and having the tools to diagnose them from a distance, which is quite important.
Frequently Asked Questions
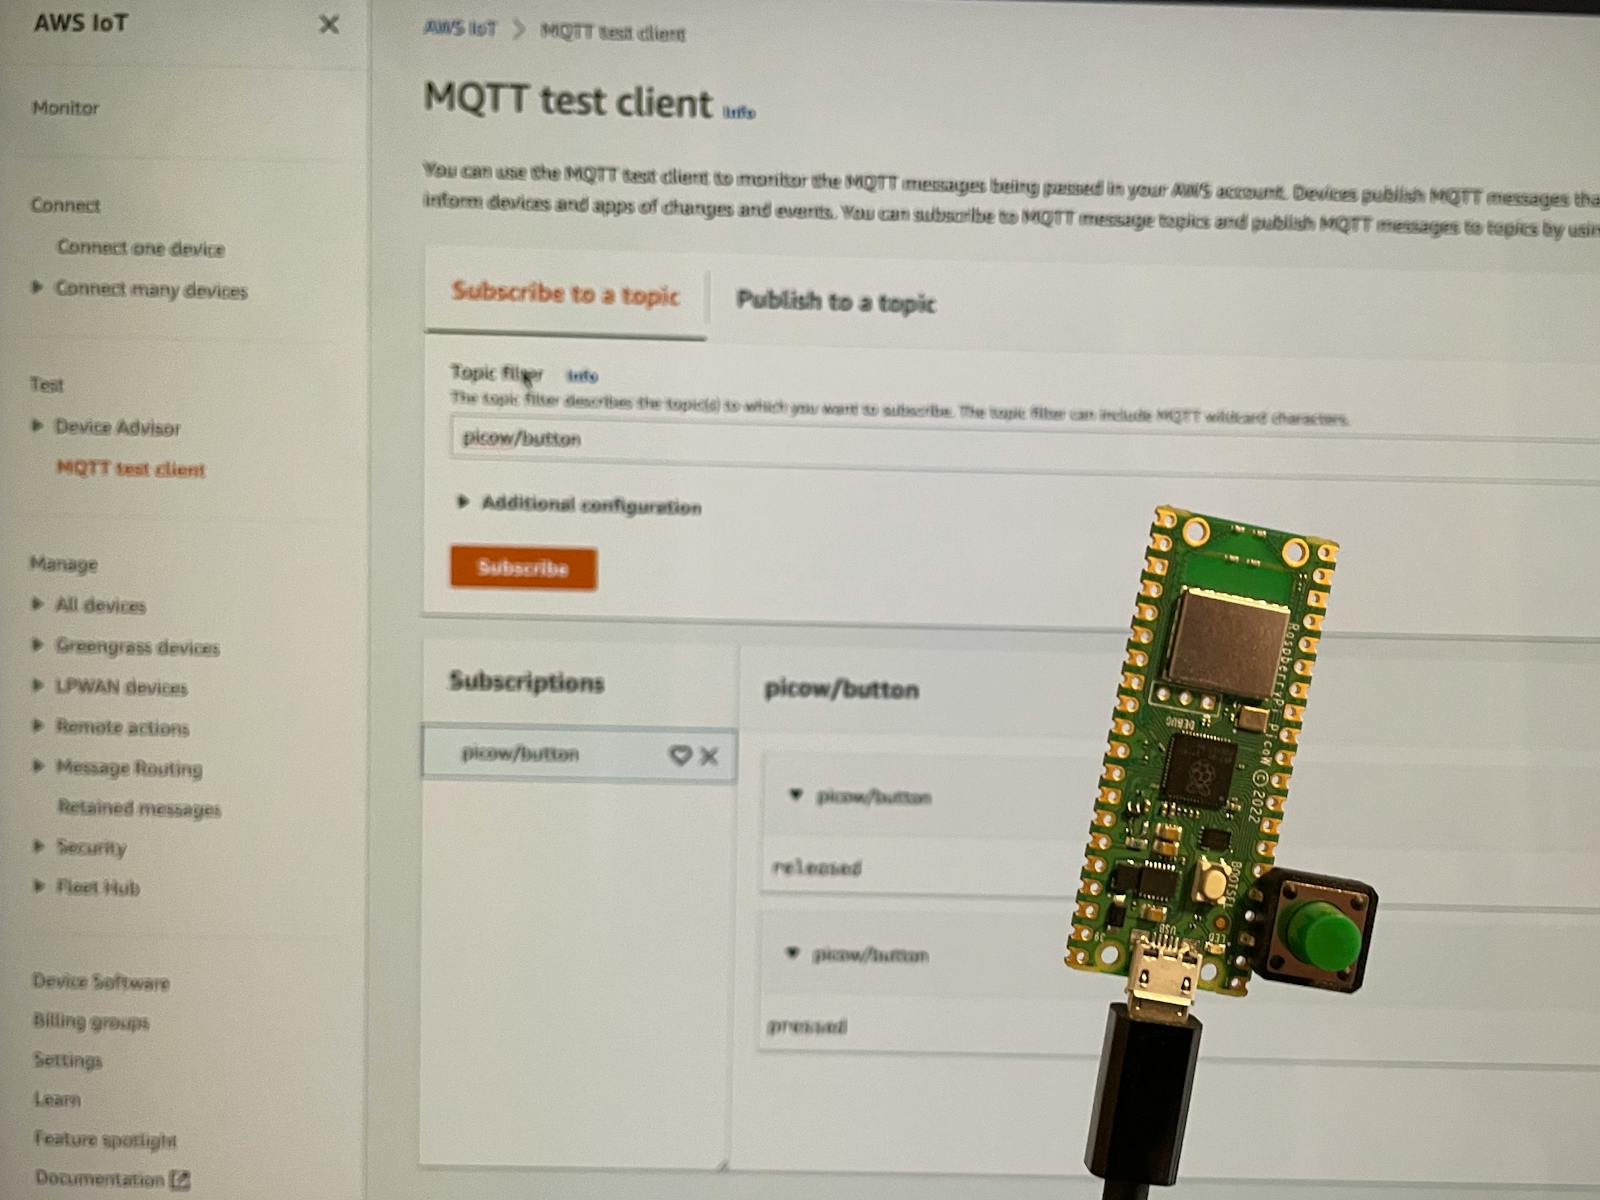
How can I connect my Raspberry Pi to a cloud VPC for free?
You can connect your Raspberry Pi to a cloud VPC-like setup for free by using the free tiers of major cloud providers, such as AWS or Google Cloud. You would typically set up a small virtual machine (VM) within their free tier, and then configure it as a VPN server. Your Raspberry Pi can then connect to this VPN server, creating a secure tunnel into the cloud provider's VPC environment. This way, your Pi gains a secure, private connection, all without direct cost, provided you stay within the free tier limits, you know.
What are the best free tools for remote IoT management?
For remote IoT management on a budget, several free tools stand out. Open-source VPN solutions like OpenVPN or WireGuard are excellent for creating secure network tunnels. For quick, temporary access to specific services, Ngrok offers a free tier that's very convenient. Tools like ZeroTier and Tailscale also provide virtual network overlays that connect your devices directly, no matter their location. These options give you, you know, a lot of flexibility for managing your devices remotely without much expense.
Is it safe to expose my Raspberry Pi to the internet?
Exposing your Raspberry Pi directly to the internet without proper security measures is generally not safe. It can make your device vulnerable to unauthorized access and attacks. However, by using secure methods like VPNs, SSH tunnels, or services like Ngrok, you can create a secure pathway for remote access. Always use strong, unique passwords, keep your Raspberry Pi's software updated, and configure firewalls to only allow necessary connections. These steps help keep your device protected, you see, even when it's accessible from afar.
Setting up a remote IoT VPC network for your Raspberry Pi, even on a budget, is absolutely possible. By using clever free tools and methods, you can gain control over your devices from anywhere. This opens up a world of possibilities for your projects, allowing you to monitor, control, and gather data remotely, much like how remote work has changed the way people offer their services. It's about empowering your ideas, you know, and making them accessible no matter where you are. Learn more about remote access solutions on our site, and perhaps check out this page for more details on getting your IoT projects off the ground. Start building your own remote IoT setup today!

Build Your Best Remote IoT VPC Network On Raspberry Pi
How To Set Up A Remote IoT VPC Network With Raspberry Pi Using Free AWS

Exploring The Impact Of Remote IoT VPC Using Raspberry Pi
