Remote Manage IoT Behind Router Example Raspberry Pi: Your Devices, Anywhere
It's a bit frustrating, isn't it, when you want to check on your smart home devices but you're not actually there? You might have a neat little setup with a Raspberry Pi controlling lights, sensors, or even a pet feeder, and then you leave the house. Suddenly, that local control feels, well, very local. This feeling is quite similar to someone trying to find remote accounting positions or data entry jobs; you know the work is out there, but connecting to it can be a real puzzle. Getting your Internet of Things (IoT) gadgets, especially those powered by a Raspberry Pi, to talk to you from outside your home network can seem like a big hurdle.
You see, most home networks have a router that acts like a gatekeeper, protecting your devices from the outside world. This is generally a good thing, a bit like how a community dedicated to Xbox remote play helps folks stream games via the cloud, even if they don't own the console themselves. It keeps things safe. However, this protection also means that direct access to your Raspberry Pi and its connected IoT devices from afar is usually blocked. You can't just type in your home IP address and expect to see your temperature readings or switch off a light.
So, how do you bridge that gap? How do you get that remote control that feels as seamless as streaming a game from a distant server? This article will walk you through the ways you can achieve this, specifically looking at how to remote manage IoT behind router example Raspberry Pi setups, making your smart home truly accessible from anywhere you happen to be. It's really about giving you that freedom, that sense of being connected, no matter where life takes you.
Table of Contents
- The Challenge of Home Networks
- Why a Raspberry Pi is a Great Choice
- Common Ways to Reach Your Pi From Afar
- Setting Up a Reverse SSH Tunnel on Your Raspberry Pi
- Keeping Things Safe and Sound
- Real-World Uses for Your Remote IoT Setup
- Frequently Asked Questions
The Challenge of Home Networks
When you're at home, your Raspberry Pi and other smart devices are all on your local network. They can talk to each other quite easily, and you can usually access them using their local IP addresses, like 192.168.1.100, for example. However, your home router uses something called Network Address Translation (NAT), which essentially hides all your internal devices behind a single public IP address. It's a bit like a big apartment building where everyone has their own apartment number, but the outside world only sees the main building address. This is a very good security feature, as it keeps most unwanted visitors from knocking on your internal "doors."
This setup, while good for protection, means that when you're out and about, perhaps trying to stream your favorite Xbox games from a remote server, your phone or laptop doesn't know how to find your specific Raspberry Pi inside your home network. It only sees your router's public address. This is where the challenge of remote manage iot behind router example raspberry pi really comes into play. It's a common issue, and honestly, many people struggle with it, much like those who apply for remote jobs non-stop and haven't landed anything, feeling like there's a missing piece to the puzzle.
The good news is that while it might seem a bit tricky at first, there are several clever ways to get around this. You don't need to be a network wizard to make it happen. We will look at methods that create a path, a kind of secret doorway, through your router's defenses, letting you reach your Raspberry Pi and its connected gadgets from pretty much anywhere you have an internet connection. This really opens up a lot of possibilities for your smart home projects, too.
Why a Raspberry Pi is a Great Choice
The Raspberry Pi is, quite frankly, a fantastic little computer for IoT projects, and it's almost perfectly suited for remote management tasks. It's small, uses very little power, and can run for ages without needing a restart. You can use it to control a huge variety of sensors and actuators, from temperature gauges to smart plugs. This versatility is pretty amazing, and it's why so many people choose it for their home automation ideas.
Also, the Pi runs a version of Linux, which gives you a lot of flexibility. This means you can install all sorts of software, from web servers to secure shell (SSH) clients, which are really important for setting up remote access. It's a bit like having a tiny, powerful server tucked away in your home, just waiting for your commands. For anyone interested in building up their skills in remote management, the Raspberry Pi is a super practical tool to learn with, offering a hands-on way to explore these concepts.
You can use a Raspberry Pi to collect data, much like remote sensing gathers information from afar. It can then send that data to a cloud service or even host a small web interface for you to interact with. Its low cost and wide community support mean that if you run into a problem, chances are someone else has faced it too, and there's a solution out there. This community aspect is very helpful, just like online groups for remote workers share news, experience, and tips.
Common Ways to Reach Your Pi From Afar
There are a few main ways people go about setting up remote access to devices behind a router. Each has its own set of pros and cons, particularly when it comes to how easy it is to set up and how safe it is to use. We will explore the most popular options here, helping you pick the best approach for your specific needs, especially when you want to remote manage iot behind router example raspberry pi.
Port Forwarding: The Simple But Risky Path
Port forwarding is often the first method people think of, and it's probably the simplest to explain. You tell your router to send all traffic coming in on a specific "port" (think of it as a numbered doorway) directly to your Raspberry Pi's local IP address. So, if you set up port 22 (the standard SSH port) to forward to your Pi, you could then SSH into your Pi from anywhere using your home's public IP address. It's a pretty direct route, you know?
The big drawback here is security. When you open a port, you're essentially punching a hole in your router's firewall. This means anyone on the internet who knows your public IP address and the open port could potentially try to access your Pi. While you can use strong passwords and other security measures, it still leaves your network a bit more exposed than other methods. For this reason, it's generally not the most recommended approach for long-term or sensitive IoT setups, unless you are very, very careful with your security practices.
Virtual Private Networks (VPNs): Your Private Tunnel
Setting up a VPN server on your home network is a much safer way to get remote access. With a VPN, you create a secure, encrypted tunnel from your remote device (like your laptop or phone) back to your home network. Once connected to the VPN, your remote device essentially becomes a part of your home network, as if it were sitting right there in your living room. You can then access your Raspberry Pi and other devices just as you would if you were at home, using their local IP addresses. This is a very popular method for remote workers, too, allowing them to securely access company resources.
The main challenge with a VPN is that it can be a bit more complicated to set up. You typically need a Raspberry Pi or another device to act as the VPN server, and you might still need to forward a single port on your router for the VPN connection itself. However, once it's up and running, it offers a high level of security and flexibility. It’s a good choice if you have multiple devices you want to access remotely, not just your Pi, and you want that extra layer of protection, which is pretty important these days.
Cloud IoT Platforms and Services: The Easy Button
Many companies offer cloud-based IoT platforms that simplify remote management. Services like AWS IoT, Google Cloud IoT Core, or even simpler ones like Adafruit IO, provide a way for your Raspberry Pi to connect to their servers. Your Pi then sends data to the cloud, and you can control it through a web interface or an app provided by the service. This avoids the need for any port forwarding or VPN setup on your end, which is very convenient, actually.
The benefit here is ease of use. These platforms handle all the tricky networking stuff for you. The downside is that you're relying on a third-party service, and some may have subscription fees, a bit like how some job boards have a subscription model to access their listings. Also, your data goes through their servers, which means you need to trust their security practices. For simple projects or those where data privacy isn't a huge concern, this can be a really good option, allowing you to remote manage iot behind router example raspberry pi with minimal fuss.
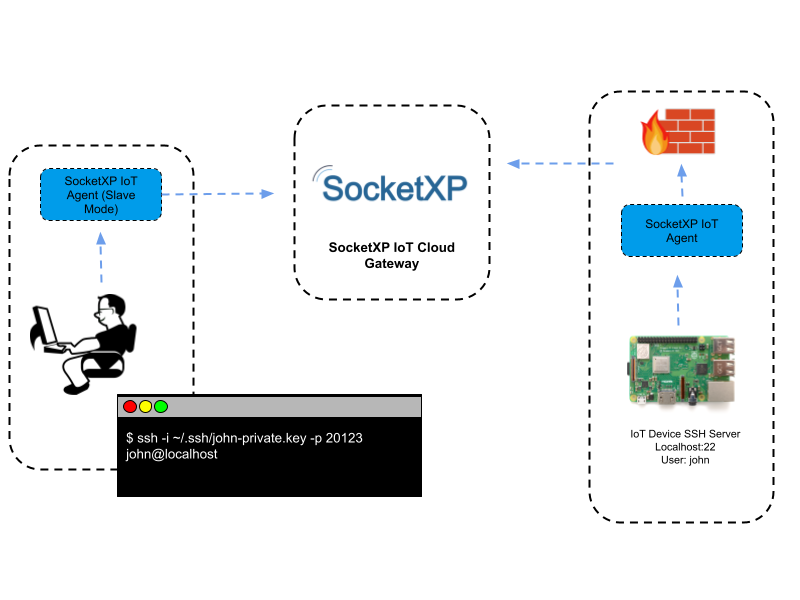
Reverse SSH Tunnels: The Clever Way Out
A reverse SSH tunnel is a really clever way to get around the router problem without opening any incoming ports on your home network. Here's how it works: your Raspberry Pi, from *inside* your home network, initiates an SSH connection to an external server (a server you control or rent, which has a public IP address). Instead of just connecting, it creates a "tunnel" back to itself. This tunnel allows you to connect to the external server, and then through that server, back to your Pi. It's like your Pi is reaching out and holding open a door for you from the other side.
This method is quite secure because your home router doesn't need any incoming ports open. The connection is initiated *outbound* from your Pi, which most routers allow by default. It's a bit more involved to set up than simple port forwarding, but it offers a good balance of security and control. Many people find this a good balance for their remote access needs, and it's a particularly strong candidate when you want to remote manage iot behind router example raspberry pi without too much fuss or risk.
Setting Up a Reverse SSH Tunnel on Your Raspberry Pi
Let's walk through how to set up a reverse SSH tunnel, as it's a highly recommended and secure method for your Raspberry Pi. This approach is really effective for getting that remote access you need, letting you control your IoT devices from anywhere. It's honestly a neat trick to have up your sleeve, and it's less complicated than it might sound at first glance.
What You Will Need
- A Raspberry Pi (any model will usually do, running Raspberry Pi OS).
- A stable internet connection for your Pi.
- An external server with a public IP address. This could be a cheap Virtual Private Server (VPS) from a provider like DigitalOcean, Linode, or Vultr. You'll need SSH access to this server.
- Basic knowledge of the Linux command line.
- An SSH client on your local computer (PuTTY for Windows, or the built-in terminal on Linux/macOS).
Step-by-Step Guide
Here’s how you can set this up. It’s a series of steps, but each one is pretty straightforward. Just take your time with it, and you'll get it working, you know?
1. Prepare Your External Server:
- First, make sure your external server is ready. You'll need to allow SSH connections on it.
- Also, you'll want to ensure that SSH daemon on your external server allows TCP forwarding. You can check this by looking at the `sshd_config` file, usually located at `/etc/ssh/sshd_config`. Make sure `AllowTcpForwarding` is set to `yes`. If you change it, you'll need to restart the SSH service (e.g., `sudo systemctl restart sshd`).
- Create a dedicated user on your external server for the tunnel, just for security. For instance, `sudo adduser tunneluser`.
2. Generate SSH Keys on Your Raspberry Pi:
- On your Raspberry Pi, open a terminal and generate an SSH key pair: `ssh-keygen -t rsa -b 4096`. Press Enter for default locations and no passphrase (unless you want one, but for automation, no passphrase is often chosen, with other security measures in place).
- Copy the public key to your external server: `ssh-copy-id -i ~/.ssh/id_rsa.pub tunneluser@your_external_server_ip`. Replace `your_external_server_ip` with your server's actual IP address. This step lets your Pi connect to the external server without needing a password, which is pretty handy for automation.
3. Set Up the Reverse Tunnel Command on Your Raspberry Pi:
- Now, the core command. On your Raspberry Pi, you'll run something like this: `ssh -N -R 2222:localhost:22 tunneluser@your_external_server_ip`
- `-N`: This means "do not execute a remote command." We just want the tunnel.
- `-R 2222:localhost:22`: This is the magic part. It says, "Take port 2222 on the *remote* server, and forward any connections there back to `localhost:22` on *this* Raspberry Pi." So, when you connect to port 2222 on your external server, you're actually connecting to port 22 (SSH) on your Pi.
- `tunneluser@your_external_server_ip`: Your username and IP address for the external server.
- You can test this command manually first. Once it runs, it will seem like nothing is happening, but the tunnel should be active.
4. Make the Tunnel Persistent (Optional but Recommended):
- For the tunnel to stay open even if the connection drops or your Pi reboots, you can use a tool like `autossh`. Install it on your Pi: `sudo apt update && sudo apt install autossh`.
- Then, you can add an `autossh` command to your Pi's startup script (e.g., `/etc/rc.local` or a systemd service). A typical `autossh` command might look like: `autossh -M 0 -o "ExitOnForwardFailure yes" -o "ServerAliveInterval 60" -o "ServerAliveCountMax 3" -N -R 2222:localhost:22 tunneluser@your_external_server_ip`
- `-M 0`: Disables the monitoring port, which is often not needed for simple tunnels.
- `-o "ExitOnForwardFailure yes"`: Ensures `autossh` exits if the tunnel fails to establish.
- `-o "ServerAliveInterval 60" -o "ServerAliveCountMax 3"`: These options help keep the SSH connection alive by sending "keep-alive" messages every 60 seconds and trying 3 times before giving up.
- Creating a systemd service for `autossh` is the most robust way to manage this on a modern Raspberry Pi OS, ensuring it starts on boot and restarts if it fails.
5. Access Your Raspberry Pi Remotely:
- From your remote computer, you can now SSH into your Pi through your external server. Use this command: `ssh pi@localhost -p 2222`
- `pi`: The username on your Raspberry Pi.
- `localhost`: This refers to your *external server*.
- `-p 2222`: This tells your SSH client to connect to port 2222 on the external server.
- When you connect to `localhost:2222` on your external server, the reverse tunnel redirects that connection to port 22 on your Raspberry Pi. You're effectively reaching your Pi through the external server. It's honestly a pretty cool setup, and it works very well.
Keeping Things Safe and Sound
Security is absolutely key when you're setting up remote access, especially for your IoT devices. It's a bit like managing remote accounting; you need to be incredibly careful with financial organizations and numbers. If you don't secure your setup properly, you could inadvertently open your home network to unwanted access. This is a big concern, and honestly, it's where many folks might run into trouble if they're not careful, much like the frustrations with technical support for remote applications that just don't have a fix.
Here are some important security tips for your remote manage iot behind router example raspberry pi:
- Use Strong Passwords and SSH Keys: Always use strong, unique passwords for your Raspberry Pi and your external server. Better yet, use SSH key authentication and disable password login for SSH entirely. This is a much more secure method.
- Limit User Permissions: On your external server, the `tunneluser` should have very limited permissions. It should only be able to establish the SSH tunnel and nothing else.
- Keep Software Updated:
- Emily Compagno
- Faith Adanza
- Hanalei Swan The 30m Shark Tank Deal She Turned Down Ndash What Happened

Best Remote IoT Setup Behind Router With Raspberry Pi
Remote IoT Behind Router Example Raspberry Pi: A Comprehensive Guide

Mastering Control Raspberry Pi Behind Router For IoT Free Android: A
