How To Securely Connect Raspberry Pi With Your VPC Network And Remote.It P2P
Are you looking to connect your Raspberry Pi to a private cloud network, perhaps for home automation, a small business server, or even a remote sensor project? It’s a common need, yet, as many of us know, making sure those connections are truly safe can feel a bit tricky. Just like when you encounter a message saying, "This connection is untrusted," or "Your device is at risk because it's out of date," you really want to avoid those kinds of warnings when it comes to your smart devices. So, how can we make sure our little Pi is talking to our big cloud securely?
Connecting a Raspberry Pi to a Virtual Private Cloud (VPC) network, and then adding a layer of peer-to-peer (P2P) access with a tool like Remote.It, gives you a lot of control and peace of mind. This setup helps keep your data safe from prying eyes and makes sure only authorized devices can get in. It's about building a robust digital bridge, one that stands strong against potential problems, too it's almost.
This guide will walk you through the steps to achieve just that, helping you understand the important pieces involved. We'll explore why this kind of secure connection is so important, especially with more and more devices linking up to the internet every day. We'll also cover the tools and methods that make this process much smoother, arguably.
Table of Contents
- Why Secure Your Raspberry Pi Connection?
- Understanding the Components
- Preparing Your Raspberry Pi
- Connecting Raspberry Pi to VPC
- Integrating Remote.It for P2P Access
- Best Practices for Ongoing Security
- Troubleshooting Common Connection Issues
- Conclusion
Why Secure Your Raspberry Pi Connection?
Think about all the important information you might have on your Raspberry Pi or the devices it controls. If someone gets access to it without permission, they could cause a lot of trouble. This could mean stealing data, messing with your systems, or even using your device for their own bad purposes, something you definitely want to avoid, you know.
The Risks of Unsecured Connections
An open or poorly protected connection is a bit like leaving your front door wide open. Messages like "There is a problem connecting securely to this website" or "The security certificate presented by this website is not secure" are big red flags. When these pop up, it means someone might be trying to fool you or get in between your connection, which is really not good.
Without proper security, your Raspberry Pi could be exposed to many kinds of attacks. This includes unauthorized access, where someone just logs in, or data breaches, where your information gets stolen. There's also the risk of denial-of-service attacks, making your device unusable, or even malware infections, which can spread to other parts of your network, and so on.
Benefits of VPC and P2P Security
Using a VPC creates a private, isolated section of the cloud just for your devices. This means your Pi isn't directly exposed to the wide internet, which is a huge step for security. It's like having your own private room in a big building, with its own locked door.
Adding Remote.It's P2P technology makes things even better. Instead of opening up ports on your router, which can be risky, Remote.It creates direct, encrypted tunnels between your devices. This means your connections are secure from end to end, making it much harder for unwanted guests to listen in or get through, pretty much.
Understanding the Components
To make this secure connection happen, we'll use a few key pieces of technology. Each one plays a specific role in keeping your system safe and accessible. Knowing what each part does helps you set things up correctly, naturally.
Raspberry Pi: The Heart of Your IoT Project
The Raspberry Pi is a small, inexpensive computer that's really popular for IoT projects. It's versatile and can do many different tasks, from running sensors to acting as a tiny server. Because it's often placed in remote spots or handles important tasks, making sure it's connected securely is super important, you know.
VPC: Your Private Cloud Space
A Virtual Private Cloud, or VPC, is a virtual network that you can set up within a public cloud provider, like Amazon Web Services (AWS), Google Cloud, or Microsoft Azure. It lets you create your own isolated network where you can launch resources, like virtual servers or databases, and control who can access them. This isolation is a core part of its security benefits, in a way.
Within your VPC, you can define your own IP address ranges, create subnets, and configure network gateways. This gives you a lot of control over your network layout and traffic flow. It's like having your own dedicated server room, but in the cloud, so.
Remote.It P2P: For Easy Remote Access
Remote.It is a service that helps you access your devices remotely without needing to mess with complex network configurations like port forwarding. It establishes secure, peer-to-peer connections between your computer and your Raspberry Pi, even if both are behind firewalls. This means you can reach your Pi from anywhere, securely, and without opening up your home network to the internet, honestly.
It works by creating a secure tunnel between your client device (like your laptop) and your Raspberry Pi. This tunnel is encrypted, so any data passing through it is protected. It's a clever way to bypass many of the common hurdles of remote access, like your internet service provider blocking certain ports, or your router's security settings, basically.
Preparing Your Raspberry Pi
Before we connect your Pi to the cloud, we need to make sure it's ready. This involves getting it updated and putting some basic security measures in place. These steps are crucial for a smooth and safe experience, at the end of the day.
Initial Setup and Updates
First, ensure your Raspberry Pi is running the latest version of its operating system, usually Raspberry Pi OS. You can do this by opening a terminal and running a couple of simple commands. This is important because updates often include security fixes that patch known weaknesses, just like your computer might tell you, "Your device is at risk because it's out of date and missing important security and quality updates."
sudo apt update sudo apt full-upgrade -y These commands fetch the latest package lists and then upgrade all installed packages to their newest versions. It's a good habit to run these regularly, perhaps once a month or whenever you plan to do something new with your Pi, to be honest.
Basic Security Measures
Change the default password for the 'pi' user immediately. The default password is well-known, and leaving it unchanged is a major security risk. Use a strong, unique password that's hard to guess, including a mix of letters, numbers, and symbols, obviously.
passwd Consider setting up SSH key-based authentication instead of password authentication. This is much more secure. You generate a pair of keys – one public, one private. You put the public key on your Raspberry Pi, and you keep the private key on your computer. This way, you don't send your password over the network, which is a really good thing, like your.
sudo nano /etc/ssh/sshd_config In this file, find the line `PasswordAuthentication yes` and change it to `PasswordAuthentication no`. Then restart the SSH service: `sudo systemctl restart ssh`.
Connecting Raspberry Pi to VPC
Now that your Pi is ready, let's get it connected to your private cloud network. The most common and secure way to do this is by setting up a VPN connection. This creates a secure tunnel between your Pi and your VPC, meaning all traffic between them is encrypted, and only authorized traffic can pass through, seriously.
VPN Connection to VPC
You'll typically use a VPN client on your Raspberry Pi to connect to a VPN server running within your VPC. OpenVPN is a popular choice because it's open-source, flexible, and very secure. You'll need to generate VPN client configuration files from your VPC's VPN server.
On your Raspberry Pi, install the OpenVPN client:
sudo apt install openvpn Then, copy your VPN client configuration file (usually a `.ovpn` file) to `/etc/openvpn/` on your Pi. You might name it something like `client.conf`.
sudo cp /path/to/your/client.ovpn /etc/openvpn/client.conf Start the OpenVPN service and enable it to start on boot:
sudo systemctl start openvpn@client sudo systemctl enable openvpn@client This will establish the secure tunnel. Your Raspberry Pi will now have an IP address within your VPC's network range, making it part of your private cloud. This is a very important step for secure communication, as a matter of fact.
IP Addressing and Security Groups
Once connected via VPN, your Raspberry Pi will get an IP address from your VPC's subnet. You'll want to make sure this IP address is either static or reserved, so it doesn't change unexpectedly. This makes it easier to manage and refer to your Pi within your VPC, in other words.
Crucially, you need to configure security groups (or network access control lists, depending on your cloud provider) within your VPC. These act as virtual firewalls, controlling what traffic can reach your Raspberry Pi and what traffic your Pi can send out. You should only allow the minimum necessary ports and protocols. For example, if you only need SSH access, only open port 22 from specific source IPs, nothing more. This is similar to the idea of only allowing trusted connections, as mentioned in your experience with browser security certificates, at the end of the day.
Integrating Remote.It for P2P Access
Even with your Pi in a VPC, you might still want easy, secure remote access from outside your cloud network without exposing your VPC directly to the internet. This is where Remote.It really shines. It provides a simple way to create secure, direct connections to your Pi, wherever it is, even through firewalls, basically.
What Remote.It Does
Remote.It creates a secure overlay network that allows your devices to find and connect to each other directly, even if they are behind different firewalls or NAT devices. It does this by using a central directory to help devices discover each other, but the actual data transfer happens peer-to-peer, encrypted from end to end. This means your data doesn't pass through Remote.It's servers, which is a big plus for privacy and speed, pretty much.
It lets you create "services" for specific applications running on your Raspberry Pi, like SSH, HTTP, or VNC. When you want to access one of these services, Remote.It helps establish a direct, secure tunnel between your client device and the Pi. This avoids the need for complex port forwarding on your router or exposing services directly to the internet, which is often the source of "untrusted connection" warnings, like your.
Installing and Configuring Remote.It
First, you'll need to create an account on the Remote.It website. Then, you can install the Remote.It agent on your Raspberry Pi. They provide a simple script for this.
sudo apt update sudo apt install remoteit After installation, you'll need to register your device with your Remote.It account. This usually involves running a command and entering your account credentials.
remoteit register This step links your Raspberry Pi to your Remote.It account, making it discoverable for remote connections. It's a quick process that sets the stage for all your remote access needs, you know.
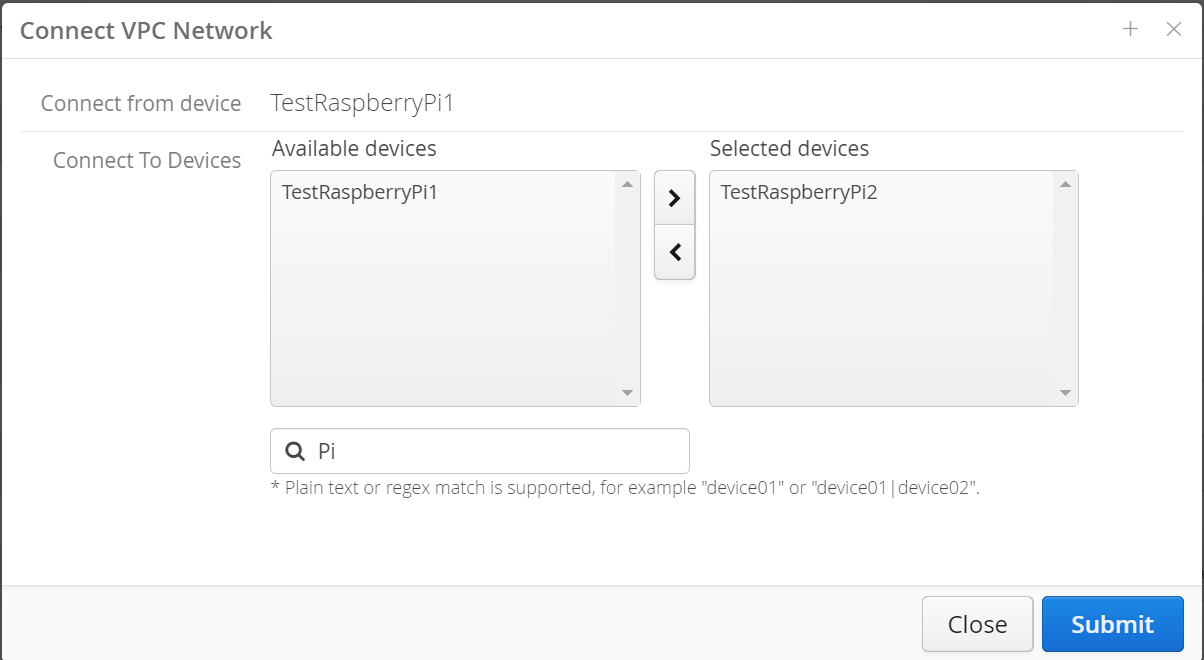
Creating and Managing Services
Once your Raspberry Pi is registered, you can start creating services. For example, to access SSH on your Pi from anywhere, you would create an SSH service.
remoteit add -s ssh -n "MyPiSSH" -l 22 This command tells Remote.It to create a service named "MyPiSSH" that connects to port 22 (the standard SSH port) on your Raspberry Pi. You can create services for other applications too, like a web server on port 80 or 443, or a VNC server.
From your computer, you would then use the Remote.It desktop application or command-line interface to connect to this service. Remote.It will provide you with a local proxy address (e.g., `localhost:33000`) that tunnels directly to your Pi's SSH service. This means you connect to `localhost`, and Remote.It securely handles the rest, sending your data over the encrypted P2P tunnel to your Pi in the VPC, making it very secure and easy, like your.
Best Practices for Ongoing Security
Setting up a secure connection is a great start, but keeping it secure requires ongoing effort. Just like your operating system needs regular updates to stay safe, your Pi's connections need attention too. These practices help ensure your setup stays robust against new threats, that, is that.
Regular Updates and Patches
Keep your Raspberry Pi's operating system and all installed software updated. Developers constantly release patches to fix security vulnerabilities. Ignoring these updates leaves your system exposed, just as your computer might warn you about being "out of date and missing important security." Set up automatic updates if possible, or schedule regular manual updates.
This also applies to the Remote.It agent and any other software running on your Pi. Staying current with all software versions is one of the simplest yet most effective ways to maintain security. It helps prevent those "security certificate problems" or "untrusted connections" from popping up, in a way.
Strong Authentication
Always use strong, unique passwords for all accounts on your Raspberry Pi and for your Remote.It account. Enable multi-factor authentication (MFA) wherever available, especially for your Remote.It account and your cloud provider account. MFA adds an extra layer of security, requiring more than just a password to log in, which is a very good idea.
For SSH, stick with key-based authentication and disable password login entirely. This significantly reduces the risk of brute-force attacks. Regularly review who has access to your Pi and remove access for anyone who no longer needs it, like your.
Monitoring and Logging
Set up logging on your Raspberry Pi to keep track of system activities and connection attempts. Regularly review these logs for any unusual or suspicious activity. Tools like `fail2ban` can automatically block IP addresses that show signs of malicious activity, like repeated failed login attempts, which is quite helpful.
Your cloud provider also offers monitoring and logging tools for your VPC. Use these to keep an eye on network traffic, security group activity, and VPN connection status. Being aware of what's happening on your network helps you respond quickly to any potential issues, so.
Troubleshooting Common Connection Issues
Even with careful setup, you might run into connection problems. Many issues stem from network configuration or firewall rules. If you see messages about "untrusted connections" or problems connecting securely, it often points to a certificate issue or a blocked port, which you might have seen with web browsers.
First, check your Raspberry Pi's network connectivity. Can it reach the internet? Can it ping your VPC's VPN server? Use `ping` and `traceroute` to diagnose basic network reachability. Then, verify your VPN client configuration. Are the certificates correct? Is the server address accurate? Sometimes, turning encryption off and on again, as suggested in "My text" for regenerating keys, can help with certain connection issues, though it's usually for specific encryption problems.
Next, look at your VPC's security groups and network ACLs. Are they allowing the necessary traffic from your Raspberry Pi to your VPN server, and vice versa? Also, check the firewall on your Raspberry Pi itself (e.g., `ufw` or `iptables`) to ensure it's not blocking outgoing VPN traffic or incoming Remote.It connections. Remote.It connections might fail if the agent isn't running or if the service isn't properly configured. Check the Remote.It agent status on your Pi and ensure the service you're trying to connect to is active, usually.
Conclusion
Connecting your Raspberry Pi securely to a VPC network and then using Remote.It for peer-to-peer access gives you a powerful and safe way to manage your IoT projects. It helps you avoid those worrisome "untrusted connection" warnings and keeps your data protected. By following these steps, you build a robust system that's both accessible and secure, very.
Remember, security is an ongoing effort, not a one-time setup. Keep your systems updated, use strong authentication, and monitor your connections. This approach ensures your Raspberry Pi remains a reliable and safe part of your connected world. For more detailed information on setting up a VPC, you might want to check out the official documentation from your cloud provider, like AWS VPC documentation, for instance.
Learn more about secure IoT practices on our site, and link to this page for advanced network configurations.
Securely Connect Remoteiot Vpc Raspberry Pi

RemoteIot VPC Network Raspberry Pi: Secure and Global IoT Connectivity
Securely Connect RemoteIoT VPC Raspberry Pi: A Comprehensive Guide
