Connect Your Raspberry Pi Remotely: The Power Of SSH RemoteIoT
Have you ever wished you could manage your Raspberry Pi or other smart devices from anywhere, without being physically there? It's a common desire for many people who work with these small computers and connected gadgets. Getting remote access to your Raspberry Pi, especially for internet-connected things, can truly change how you work on projects. This guide is all about how you can achieve that, using something called SSH and a helpful service known as RemoteIoT.
For tech lovers and professionals alike, the idea of controlling a Raspberry Pi or an IoT device from afar is quite appealing. It offers a lot of freedom in how you handle your different setups. You might have a home automation system, a small server, or even a robot, and being able to check in or make changes without being in the same room is, well, very convenient. So, we'll talk about how this works, focusing on secure ways to do it, and how services like RemoteIoT make it even easier.
When you're dealing with devices that are out of reach, perhaps at another location or just hidden away, a way to connect securely is important. This is where the combination of SSH and RemoteIoT for your Raspberry Pi comes into play. It's a method that lets you reach your devices over the internet, giving you control and the ability to transfer files, all without needing to open up specific "ports" on your home network, which can be a bit tricky and sometimes less safe. So, let's look at how you can get started and what you can do with this kind of setup.
Table of Contents
- Understanding SSH, RemoteIoT, and Raspberry Pi
- Setting Up SSH on Your Raspberry Pi
- Connecting with RemoteIoT for Internet Access
- Common Challenges and Solutions with SSH
- Advanced SSH Usage for Raspberry Pi Management
- Securing Your Remote IoT Devices
- Frequently Asked Questions
- Gaining Control Over Your Projects
Understanding SSH, RemoteIoT, and Raspberry Pi
To really get a good handle on connecting to your devices from anywhere, it helps to know a little bit about the main pieces involved. We're talking about SSH, RemoteIoT, and of course, the Raspberry Pi itself. Each part plays a specific role in making this remote access possible and, very importantly, secure.
What is SSH?
SSH, which stands for Secure Shell, is a network method that allows you to connect to a remote computer securely. It's like a secret tunnel for your commands and data, keeping everything private and safe from prying eyes. When you use SSH, you can run commands on your Raspberry Pi as if you were sitting right in front of it, which is pretty useful. It encrypts all the traffic between your computer and the Raspberry Pi, so your information stays protected, you know, which is a big deal for security.
A key part of SSH is how it handles host keys. Every time you connect to a new remote machine using SSH, that machine sends a unique "host key." Your computer remembers this key, and if it ever changes for the same address, SSH will warn you. This feature is there to stop something called "man-in-the-middle" attacks, where someone tries to pretend to be your Raspberry Pi. If you see a warning that the host key for a certain address has changed, it's worth checking out, because, you know, it could mean something fishy is going on, or it could just be that you rebuilt your Raspberry Pi.
What is RemoteIoT?
RemoteIoT is a service that helps you connect to your Raspberry Pi and other IoT devices over the internet without needing to change your router settings, like setting up port forwarding. This is a big deal because port forwarding can be a bit complicated for some people and can also introduce security risks if not done carefully. RemoteIoT acts as a middleman, creating a secure tunnel from your device to their service, and then from their service to your computer. This makes connecting to your Raspberry Pi from anywhere much simpler, and also safer, which is pretty neat.
The service is designed to be very user-friendly. Once you sign up, you just install a small piece of software, a client, on your Raspberry Pi. After that, your Raspberry Pi shows up in your RemoteIoT account dashboard, ready for you to connect. It's a streamlined approach to managing your Raspberry Pi devices, meaning you can get things done faster and with less fuss, so it's a very practical solution.
Why Raspberry Pi for Remote Projects?
The Raspberry Pi is a tiny, affordable computer that's very popular for all sorts of projects, especially those that involve connecting to the internet or controlling other devices. Its small size, low power usage, and the fact that it runs a version of Linux make it perfect for setting up remote servers, home automation hubs, or even just learning about computing. Because it's so versatile, many people want to access their Raspberry Pi from afar, and that's exactly where SSH and RemoteIoT become so valuable. It gives you a lot of freedom to experiment and build, you know, without being tied down to one spot.
Setting Up SSH on Your Raspberry Pi
Before you can connect to your Raspberry Pi from across the internet, you first need to make sure SSH is working on it. This initial setup is usually done when your Raspberry Pi is on the same local network as your computer. It's a pretty straightforward process, but getting it right is important for everything else to fall into place. So, let's get into the details of how to do that.
Initial SSH Access on Your Local Network
To begin, you'll need to enable SSH on your Raspberry Pi. If you're using Raspberry Pi OS with a desktop, you can do this through the Raspberry Pi Configuration tool under the Interfaces tab. Just make sure the SSH option is turned on. If you're running a "headless" setup without a screen, you can enable SSH by placing an empty file named `ssh` (no extension) in the boot partition of your SD card before you even start the Pi. This tells the system to enable SSH when it first boots up, which is pretty handy.
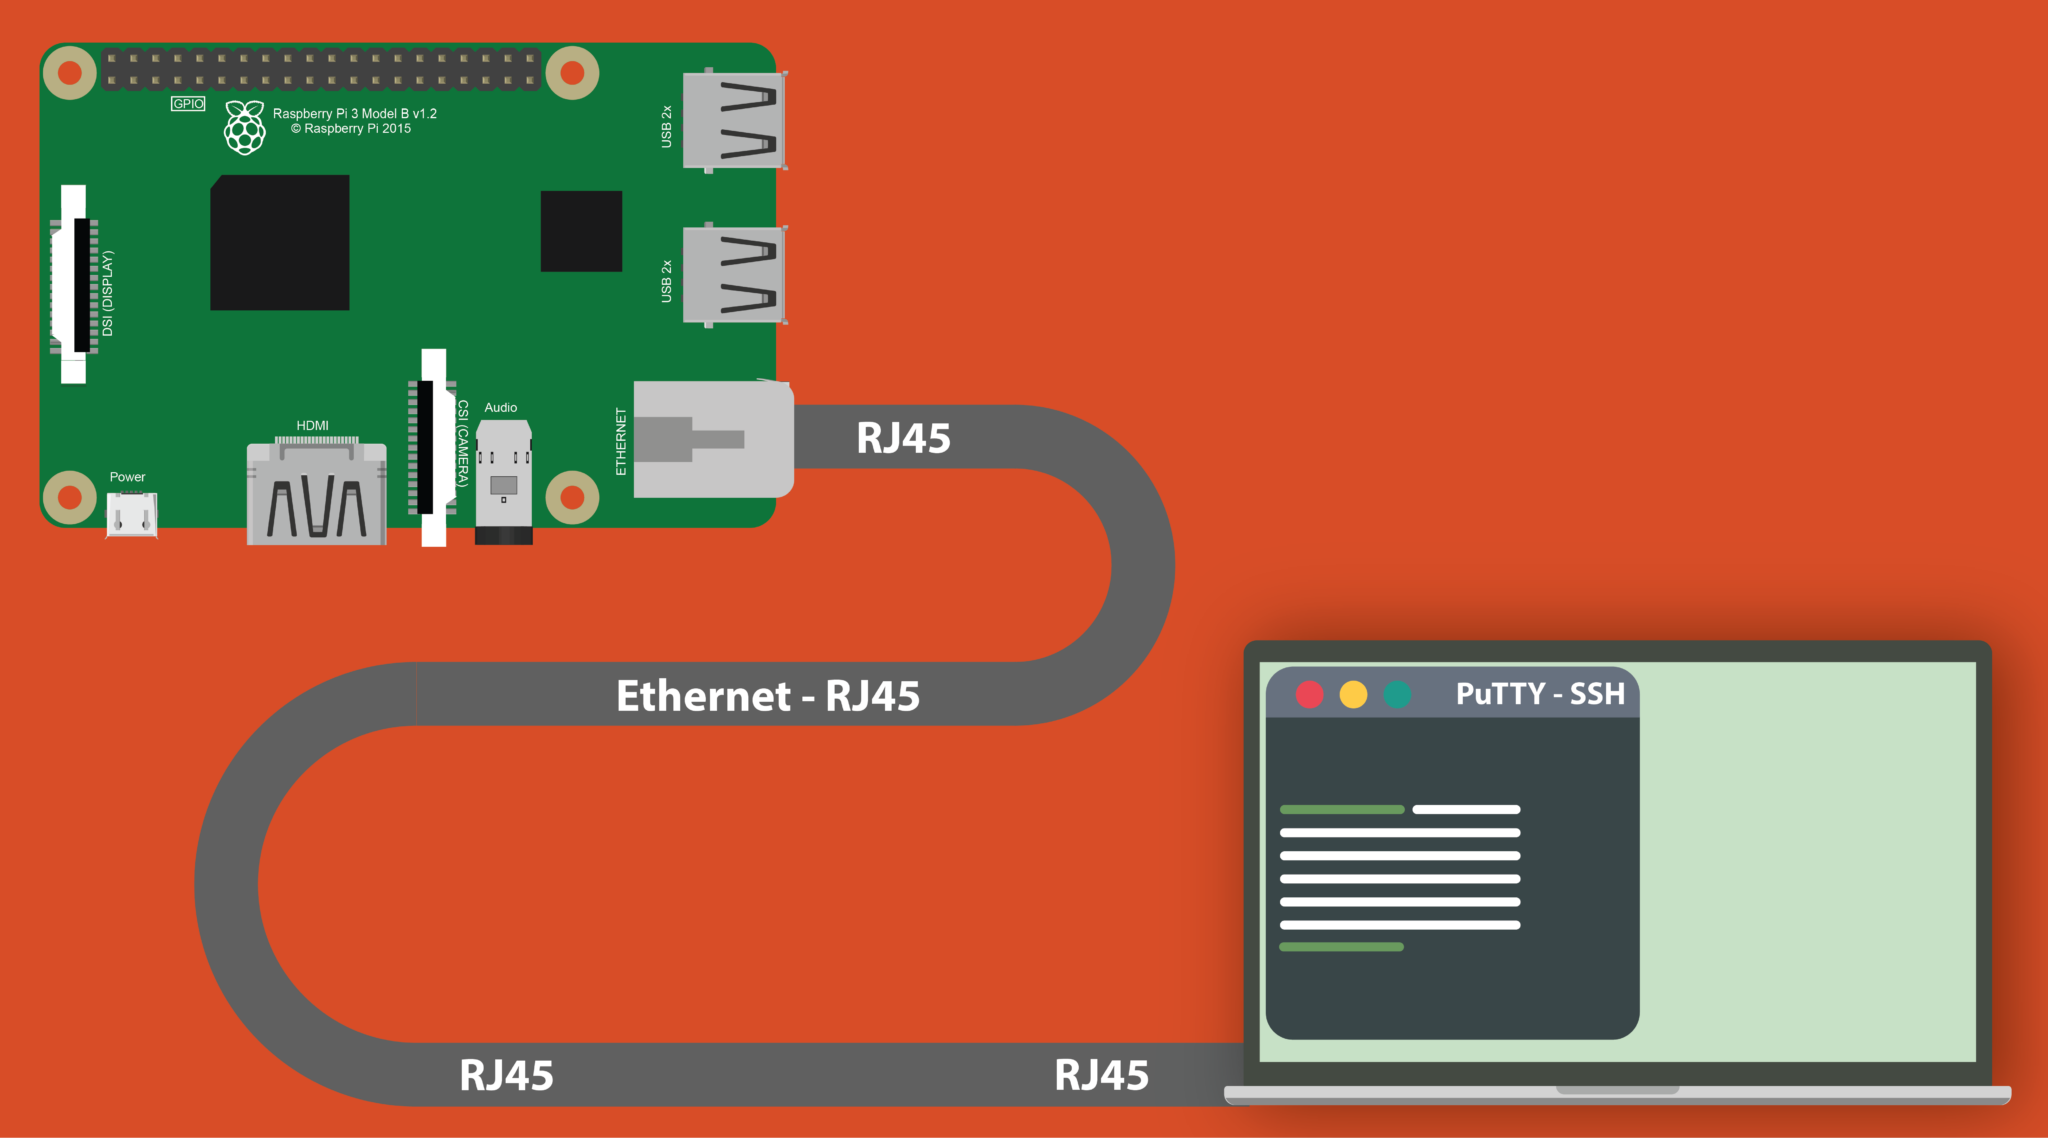
Once SSH is enabled, you can connect to your Raspberry Pi from another computer on the same local network. You'll need your Raspberry Pi's IP address. You can usually find this by typing `hostname -I` into the Raspberry Pi's terminal if you have a screen connected, or by checking your router's connected devices list. Then, from your computer's terminal, you would type `ssh pi@your_raspberry_pi_ip_address`, replacing the example IP with your actual one. The default password is `raspberry` for the `pi` user, but you should definitely change this right away for better security, which is a good practice, you know.
Managing SSH Keys for Better Security
While using a password for SSH works, a much safer way to connect is by using SSH key pairs. This involves having a public key on your Raspberry Pi and a private key on your computer. When you try to connect, your computer uses the private key to prove its identity to the Raspberry Pi, and the Raspberry Pi verifies it with the public key. This is generally more secure than passwords, which can be guessed or brute-forced, which is why it's recommended.
Setting up an SSH key pair involves a few steps. First, you'll generate the key pair on your local machine, often in your `~/.ssh/` directory. Then, you need to copy your public key to your Raspberry Pi. A common way to do this is using the `ssh-copy-id` command, which handles the copying and setting up permissions for you. For example, you might run `ssh-copy-id pi@your_raspberry_pi_ip_address`. This command puts your public key into the `~/.ssh/authorized_keys` file on your Raspberry Pi, allowing password-less login, which is pretty convenient, too.
Sometimes, you might need to use a specific SSH key pair that isn't your default `id_rsa` key. This is often the case when you're connecting to a specific proxy server or a service that requires a unique key. When connecting, you can specify which key to use with the `-i` flag. For instance, `ssh -i ~/.ssh/my_special_key user@remote_host`. This ensures you're using the correct access rights for that particular connection, which is important for managing different access levels, you know.
If you're working with services like GitHub or GitLab, you'll need to add your public SSH key to your account settings. For instance, to copy your public key to your clipboard on a Mac, you'd use the command `pbcopy < ~/.ssh/id_rsa.pub`. Then, you just go to your GitHub account settings, find the "SSH and GPG keys" section, click "New SSH key," give it a title, and paste the key from your clipboard. This allows you to clone and push code to remote repositories securely, which is pretty common for developers.
Connecting with RemoteIoT for Internet Access
Once SSH is enabled on your Raspberry Pi and you're comfortable with local connections, the next step is to get it accessible over the internet using RemoteIoT. This service simplifies the whole process, letting you skip the complexities of port forwarding and dynamic DNS. It's a very streamlined way to manage your remote access needs, you know, making things much easier.
Installing the RemoteIoT Client
After you've created an account with RemoteIoT, the first thing you'll need to do is install their client software on your Raspberry Pi. This client is a small program that runs on your device and connects it to the RemoteIoT service. They usually provide simple commands that you can just copy and paste into your Raspberry Pi's terminal. You might access your Raspberry Pi with SSH on your local network to do this initial installation. For example, it could be a `curl` command to download a script, followed by running that script. This sets everything up automatically, which is pretty helpful.
The installation process typically involves a few steps: downloading the client, installing any necessary dependencies, and then starting the RemoteIoT service. Once the client is up and running, your Raspberry Pi will establish a secure connection with the RemoteIoT platform. This connection is persistent, meaning your Raspberry Pi stays online and reachable through the service as long as it has internet access. It's a fairly simple process, and RemoteIoT usually provides clear instructions to guide you through it.
Accessing Your Raspberry Pi Through the RemoteIoT Dashboard
With the RemoteIoT client installed and running on your Raspberry Pi, you can now open the RemoteIoT portal in your web browser and log in to your dashboard. You should see your Raspberry Pi listed among your account devices. From this dashboard, you can initiate an SSH connection to your Raspberry Pi directly through your browser, or get the connection details to use your local SSH client. This means you can control your Raspberry Pi from a PC, Linux, or Mac computer, which is pretty flexible.
The dashboard often provides a one-click SSH option, which is incredibly convenient. It handles all the underlying connection details, making it feel just like you're connecting locally, but you're actually doing it over the internet. This setup truly simplifies remote management and control, allowing you to access your Raspberry Pi's command line interface from anywhere in the world, which is a significant benefit for remote projects, you know.
Common Challenges and Solutions with SSH
Even with the best intentions, sometimes things don't go perfectly when setting up SSH or using it for remote access. You might run into some error messages that seem a bit confusing at first. Knowing what these messages mean and how to fix them can save you a lot of frustration. So, let's look at some common issues that people encounter when working with SSH, drawing from real experiences.
Connection Issues and Host Keys
One common problem you might see is a "Connection reset by peer" error, sometimes followed by "Could not read from remote repository." This message often means the connection was abruptly closed by the other side, the Raspberry Pi in this case. It could happen for various reasons, like network instability, a firewall blocking the connection, or even something going wrong on the Raspberry Pi itself that causes it to drop the connection. If you're using Git, this error can pop up if your SSH keys aren't correctly set up or if the remote repository's server is having issues. It's important to make sure you have the correct access rights and that the repository actually exists, you know, before assuming it's a network problem.
Another frequent SSH warning is about a "Host key for domain.example has changed." As mentioned earlier, SSH remembers the unique key for each host it connects to. If that key changes, it's a security warning because it could indicate a "man-in-the-middle" attack. However, it's also very common if you've reinstalled your Raspberry Pi's operating system, moved it to a new network, or the server itself got reconfigured. If you're sure it's not a security threat, you can remove the old key from your computer's `~/.ssh/known_hosts` file. This lets SSH accept the new key for that address. It's a good practice to be cautious here, but sometimes it's just a routine change.
Dealing with Remote Script Errors
Sometimes, when you try to run a command or a script on your remote Raspberry Pi via SSH, you might get an error like "For some reason your remote script returns 255, and ssh just delivers its result to you." This means the script you tried to run on the Raspberry Pi exited with a specific error code, `255` in this case. SSH itself isn't the problem here; it's simply reporting what the remote script did. To fix this, you need to look at the script itself. What commands is it trying to run? Are there any typos? Does it have the right permissions to execute? Checking the script's content and its intended actions is the first step to figuring out why it's failing, you know, because the error is coming from the script, not the SSH connection.
X11 Forwarding and Display Settings
If you're trying to run graphical applications on your Raspberry Pi and display them on your local computer, you'll use something called X11 forwarding. If you run an SSH command and the "display is not set," it means SSH isn't forwarding the X11 connection properly. This can happen if X11 forwarding isn't enabled on your SSH client or server, or if you don't have an X server running on your local machine. The server won't reply either way if it's not set up, which is a security precaution to hide details from potential attackers. To fix this, make sure your SSH command includes the `-X` flag (e.g., `ssh -X pi@your_raspberry_pi_ip_address`), and that X11 forwarding is enabled in your SSH server configuration on the Raspberry Pi. You also need an X server like XQuartz on macOS or MobaXterm on Windows, which is pretty standard for graphical remote access.
Advanced SSH Usage for Raspberry Pi Management
SSH isn't just for running commands; it's also incredibly useful for moving files and even entire folders between your local computer and your Raspberry Pi. This is especially handy when you're developing projects on your main computer and then need to deploy them to your remote Raspberry Pi. Knowing how to do this efficiently can save you a lot of time and effort, you know, making your workflow smoother.
Copying Directories Between Machines
A very common task when managing remote devices is copying files or whole directories. While you might find guides on how to copy from a remote machine to a local one using `scp` (Secure Copy Protocol), doing it the other way around, from your local machine to the remote Raspberry Pi, is just as simple. The `scp` command works for both directions. To copy an entire directory from your local machine to your Raspberry Pi, you would use the `-r` flag, which stands for "recursive."
For example, if you have a folder named `my_project` on your local computer that you want to copy to the `home/pi/` directory on your Raspberry Pi, you would use a command like this: `scp -r /path/to/local/my_project pi@your_raspberry_pi_ip_address:/home/pi/`. This command tells `scp` to copy the `my_project` directory and all its contents recursively to the specified location on your Raspberry Pi. It's a very powerful tool for syncing your work, which is quite useful for development, you know.
Similarly, if you wanted to copy a single file, you would just omit the `-r` flag and specify the file path. For instance, `scp /path/to/local/my_file.txt pi@your_raspberry_pi_ip_address:/home/pi/`. This flexibility makes `scp` an essential tool for anyone working with remote Raspberry Pi devices. It ensures you can easily transfer the necessary files and folders without much trouble, which is a big help when you're working on projects remotely.
Securing Your Remote IoT Devices
When you connect your Raspberry Pi or any IoT device to the internet, security becomes a very important topic. You want to make sure that only authorized people can access your devices and that your data stays safe. Following some basic security practices can help protect your devices from potential threats. This is a big part of responsible remote management, you know, keeping everything locked down.
One of the first steps is always to change default passwords. The default username `pi` and password `raspberry` are widely known, so anyone could try to log into your device if it's exposed. Creating strong, unique passwords or, even better, using SSH key pairs for authentication significantly boosts your security. As we discussed, SSH keys are much harder to guess or crack than traditional passwords. It's a simple change that makes a huge difference, which is pretty effective.
Keeping your Raspberry Pi's software up to date is another vital security measure. Regular updates often include security patches that fix vulnerabilities. You can update your Raspberry Pi by running `sudo apt update` and then `sudo apt upgrade` in the terminal. This helps protect against newly discovered weaknesses that attackers might try to exploit. It's like patching holes in a fence; you want to keep it in good repair, you know, to keep things out.
Also, consider limiting SSH access to specific users or IP addresses if possible. While RemoteIoT handles much of the internet exposure securely, on your local network, you can configure your SSH server to only allow certain users to log in via SSH. You can even disable password authentication entirely once you're reliably using SSH keys. These steps, along with understanding host key warnings, help create a much safer environment for your remote IoT devices. Learn more about secure practices on our site, and link to this page here for more information on device hardening.
Frequently Asked Questions
People often have similar questions when they're getting started with remote access for their Raspberry Pi. Here are some common ones, with some simple answers to help you out.
How do I remotely access my Raspberry Pi for free?
You can definitely access your Raspberry Pi remotely for free using several methods. The most common free way is through SSH. If you're on the same local network, SSH is built-in and ready to go. For internet access without paying for a service, you could try setting up port forwarding on your router and using a dynamic DNS service. However, this can be a bit more complex and might have security considerations. Services like RemoteIoT often offer free tiers or trials that let you get started without cost, which is a good option for many people, you know, to test things out.
Can I remotely control my Raspberry Pi from a PC, Linux, or Mac computer and transfer files using SSH?
Absolutely, yes! SSH is designed for exactly this kind of control. You can use your PC, Linux machine, or Mac to connect to your Raspberry Pi's command line interface. Once connected, you can run any command as if you were sitting right in front of it. Plus, as we discussed, tools like `scp` (Secure Copy Protocol) which works over SSH, let you easily transfer individual files or entire directories between your local computer and your Raspberry Pi. This makes SSH a very versatile tool for managing your remote projects, which is pretty convenient, too.
How do I securely connect to my Raspberry Pi or IoT device remotely over the internet without port forwarding?
Connecting securely over the internet without port forwarding is a key concern for many. The best way to do this is by using a service like RemoteIoT. These services create a secure, encrypted tunnel from your Raspberry Pi to their cloud platform, and then allow you to connect to your device through their web dashboard or a local client. This avoids the need to open up specific ports on your home router, which can be a security risk. It's a much simpler and generally safer way to get remote access, which is why it's becoming so popular, you know, for remote management.
Gaining Control Over Your Projects
Getting a good handle on SSH for remote IoT devices like your Raspberry Pi truly gives you a lot of freedom and control over your projects. Whether you're a hobbyist or a professional, being able to manage and interact with your devices from anywhere opens up so many possibilities. It means you're not tied to one location, and you can troubleshoot, update, or

Comprehensive Review Of RemoteIoT VPC SSH Raspberry Pi
RemoteIoT Platform SSH Raspberry Pi: A Comprehensive Guide To Secure

Mastering SSH Remote IoT On Raspberry Pi: A Comprehensive Guide
