Securely Connect Remote IoT P2P SSH Ubuntu Example: A Safer Way To Access Your Devices
It's a familiar worry, isn't it? That feeling when your computer or, say, a smart device, just isn't quite right. You get those messages, the ones saying "your device is at risk because it's out of date and missing important security and quality updates." It makes you think about all your connected things, especially those little IoT gadgets out there doing their job. Keeping them safe, well, that's a big deal. We want to get you back on track, so your devices can run more securely, you know? It's just a good idea, really, to have peace of mind about your technology.
You might have seen it happen with websites, too. Perhaps you've tried to visit a page, and then a message pops up: "This connection is untrusted you have asked firefox to connect securely to www.xxxxxxxxxxxx.com, but we can't confirm that your connection is secure." Or maybe it says, "There is a problem connecting securely to this website the security certificate presented by this website is not secure." These little warnings, they really do tell a story, don't they? They show us that keeping things private and safe online is a constant job. Security certificate problems may indicate an attempt to mess with your data, so you just can't be too careful.
So, what if you have an IoT device, like a tiny computer running Ubuntu, and you need to reach it from far away? How do you make sure that connection is just as safe as can be? This is where understanding how to securely connect remote IoT P2P SSH Ubuntu example setups becomes super helpful. It's about making a direct, private path to your device, sort of like having a secret handshake only you and your device know. We'll talk about how to do this, giving you some practical steps and ideas for keeping your remote connections safe and sound. It's really not as hard as it might sound, and honestly, it gives you a lot more control.
Table of Contents
- Why Secure Connections Are a Must for IoT
- What P2P SSH Means for Your IoT Devices
- Getting Your Ubuntu IoT Device Ready
- Setting Up SSH Keys for P2P Access
- Achieving P2P Connectivity: Methods and Tools
- A Practical Securely Connect Remote IoT P2P SSH Ubuntu Example Walkthrough
- Maintaining Security for Your Remote IoT Connections
Why Secure Connections Are a Must for IoT
The Risks of Open Connections
Think about your IoT devices, maybe a camera, a smart thermostat, or a sensor in your garden. If they are just out there on the internet without good protection, well, it's a bit like leaving your front door wide open. Bad actors, they're always looking for easy ways in, you know? They might try to get into your device, steal your information, or even use your device for their own bad purposes. It's a pretty scary thought, honestly, and it happens more often than you'd think.
An open connection means that data going back and forth could be seen by anyone who knows how to look. This is why you get warnings like "This connection is untrusted" when you're on a web browser. It's a similar kind of problem for IoT devices. Without proper security, your little device, which might seem harmless, could actually become a way for someone to get into your whole home network. So, keeping these connections locked down is, quite frankly, a really big deal.
Learning from Past Connection Issues
We've all had those moments, haven't we? Where something just doesn't connect right. You might have seen messages like "There is a problem connecting securely to this website the security certificate presented by this website was not issued by a trusted certificate authority." These kinds of messages are important clues. They tell us that the digital handshake, the way two computers confirm they are who they say they are, didn't work out. This sort of thing highlights why we need strong ways to verify who is connecting to our devices.
- Aditi Mistry Nipples
- Iot P2p Connect Free
- Howard Morley Oregon
- Anjali Arora Viral Video
- Remoteiot Device Ssh
When it comes to IoT, that lesson is even more important. You want to make sure that only you, or people you trust, can talk to your devices. It's about making sure the "security certificate problems" don't happen with your own gear. Learning from these past issues, where connections were not secure, really helps us understand why setting up something like a securely connect remote IoT P2P SSH Ubuntu example is so important. It's about being proactive, you see, rather than waiting for a problem to happen.
What P2P SSH Means for Your IoT Devices
Peer-to-Peer Basics
So, what does "P2P" mean in this context? Well, basically, it means "peer-to-peer." Think of it like this: instead of your IoT device talking to a central server, and then you talking to that server, the device and your computer try to talk directly to each other. It's like two friends having a private chat, rather than talking through a big public announcement system. This can be really good for speed and for keeping things private, too it's almost a direct line.
For IoT, this direct connection can be super helpful. It might mean less lag, and it can sometimes make things simpler to set up, in a way. You're not relying on some big company's server to relay your commands. It's just you and your device, talking straight. This direct approach, honestly, has a lot of good points, especially when you want control and privacy for your little gadgets. It's a pretty neat idea, all things considered.
SSH: Your Secure Tunnel
Now, let's talk about SSH. That stands for "Secure Shell." Think of it like building a very, very strong, secret tunnel between your computer and your IoT device. Everything that goes through this tunnel is encrypted, which means it's scrambled up so no one else can read it. It's a bit like sending a coded message that only the person with the right key can understand. This is really, really important for keeping your data safe.
When you use SSH, you're not just sending commands; you're doing it in a way that's protected from prying eyes. It uses special keys, sort of like digital fingerprints, to make sure that only the right people can get into the tunnel. This makes it a very trusted way to connect to remote computers, and it's why it's such a good choice for securely connect remote IoT P2P SSH Ubuntu example setups. It gives you that peace of mind, knowing your connection is private, you know?
Getting Your Ubuntu IoT Device Ready
Choosing the Right Ubuntu Flavor
Ubuntu comes in a few different versions, or "flavors," as they call them. For tiny IoT devices, you're probably not going to want the full desktop version with all the bells and whistles. That would be too much for a small device. Instead, you'll want something light, like Ubuntu Core or Ubuntu Server. These versions are made to run on devices with less power and storage, which is exactly what most IoT gadgets have. They're pretty efficient, actually.
Ubuntu Core, for example, is very compact and uses "snaps" for applications, which makes managing software a bit easier. Ubuntu Server is also a good pick if you need a more traditional Linux setup without a graphical interface. Picking the right one is important, so your device runs smoothly without using up too many resources. It's about finding the right fit for your little machine, so it can do its job well, you see.
Initial Setup and Updates
Once you've got your Ubuntu flavor picked out, you'll need to get it installed on your IoT device. This usually means putting the operating system onto an SD card or the device's internal storage. After it's installed and you turn it on for the first time, there are a few important steps to take. First, you'll want to set up a basic user account, not just use the default "root" user, if there is one. This is a basic security step, really.
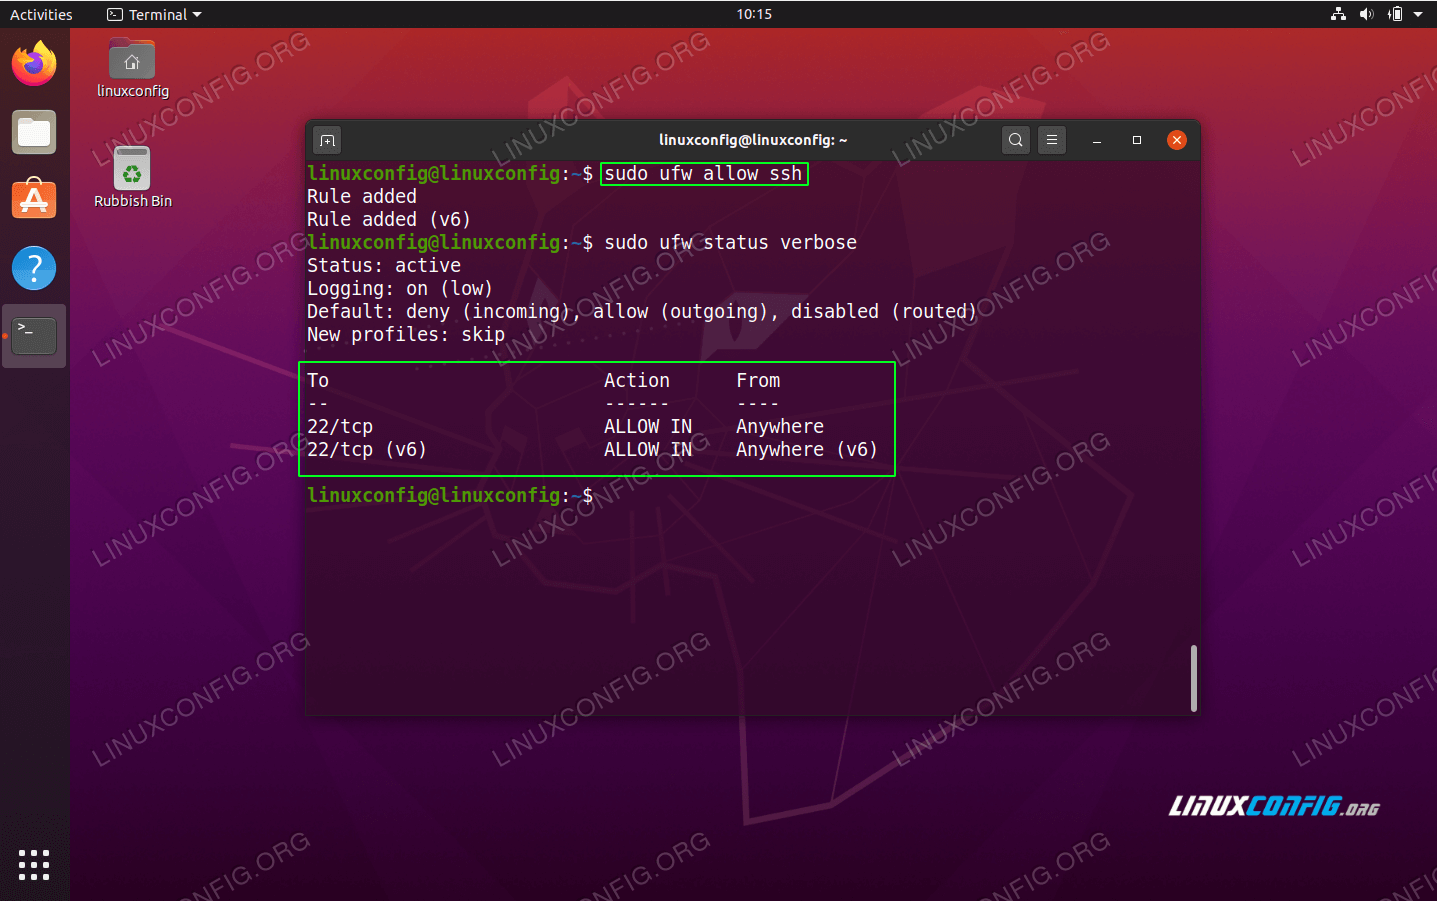
Then, and this is super important, you need to make sure your device is completely up to date. You know how your computer sometimes says "your device is at risk because it's out of date and missing important security and quality updates"? Well, the same goes for your IoT device. You'll want to run commands like `sudo apt update` and `sudo apt upgrade` to get all the latest security fixes and software improvements. This helps your device run more securely right from the start, which is a pretty good way to begin, honestly.
Setting Up SSH Keys for P2P Access
Generating Your Key Pair
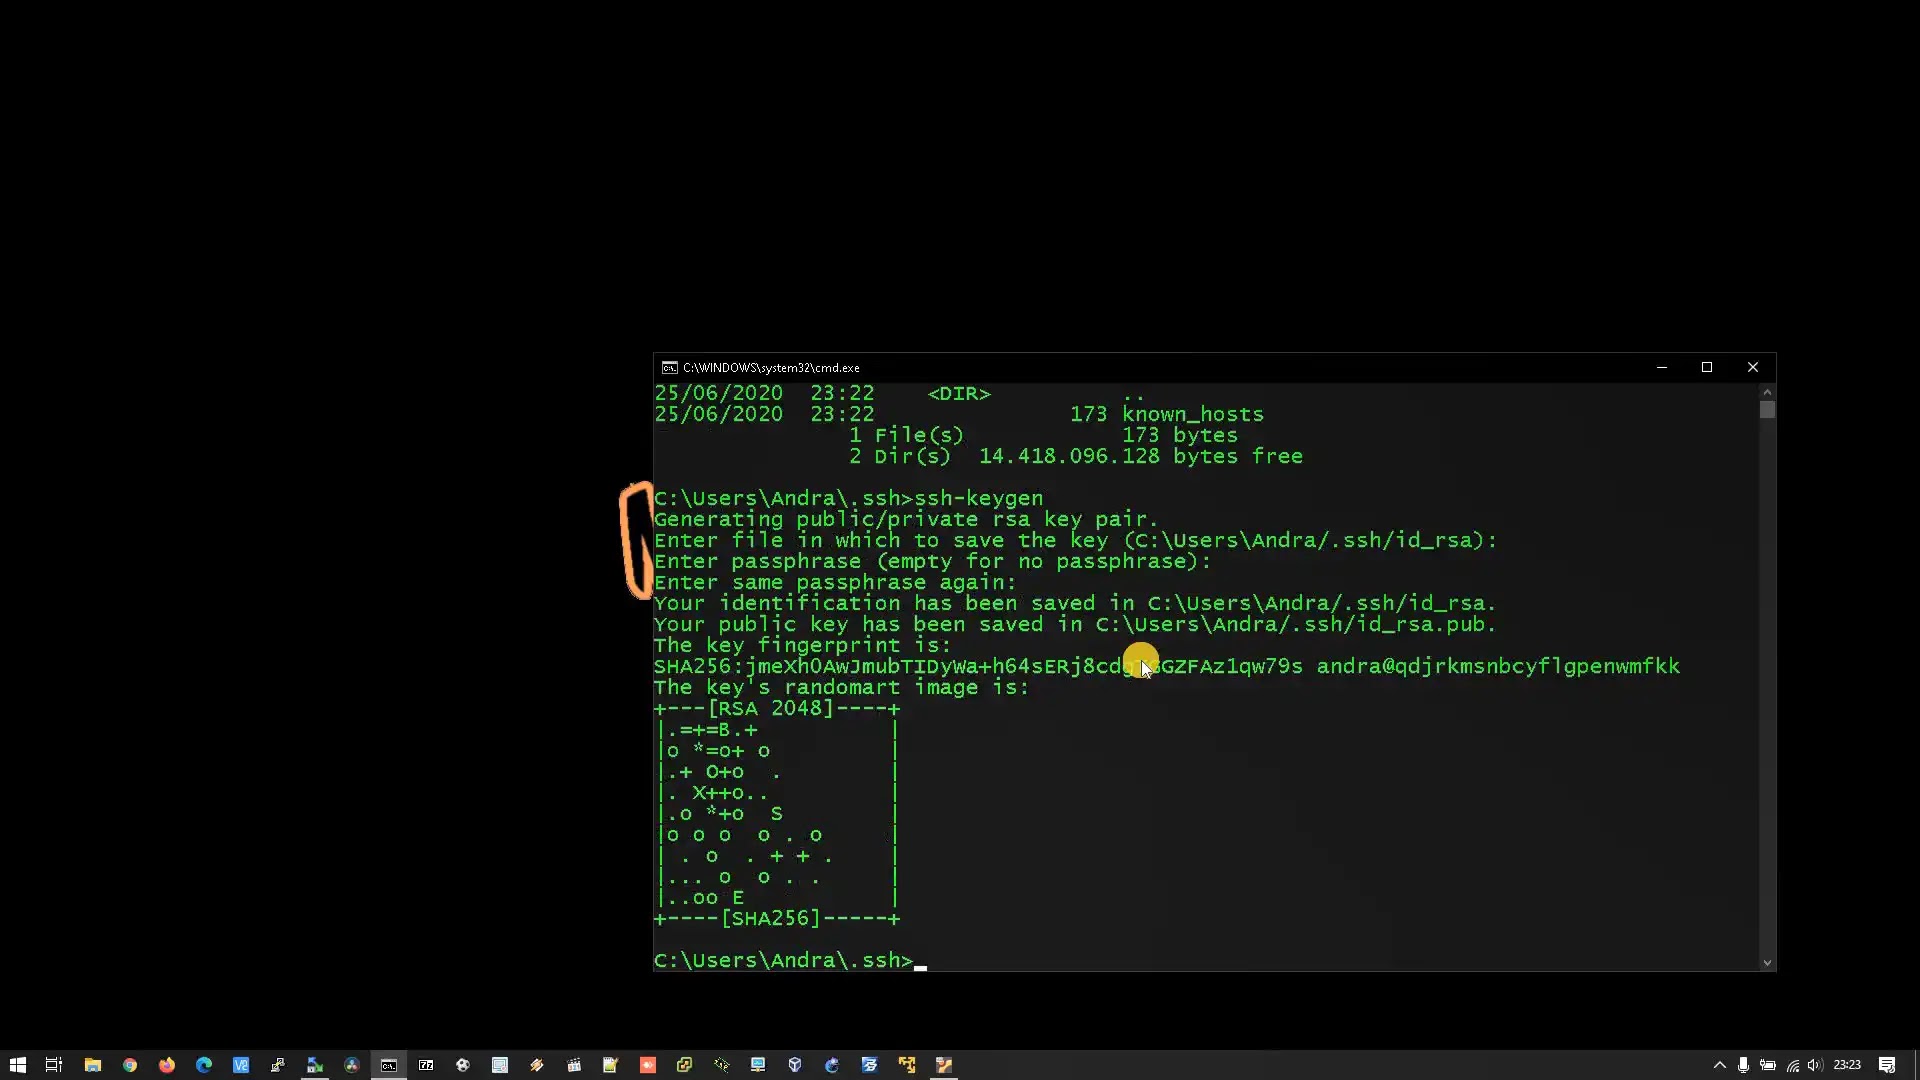
To make that secure SSH tunnel, you'll use something called an SSH key pair. This is two parts: a public key and a private key. Think of the public key like a padlock that anyone can see, and the private key like the only key that can open that specific padlock. You generate these keys on your computer, the one you'll use to connect to your IoT device. It's a fairly simple process using a command like `ssh-keygen` in your terminal, honestly.
When you make these keys, the system will ask you where to save them and if you want a passphrase. A passphrase is like a password for your private key, and it's a very good idea to use one. It adds an extra layer of protection, so even if someone gets hold of your private key, they still can't use it without the passphrase. It's a bit like having a safe inside another safe, which is just good practice, really.
Distributing the Public Key
Once you have your key pair, you need to put the public key onto your IoT device. This tells the IoT device, "Hey, if someone tries to connect with the matching private key, let them in." You can copy the public key to the device using a command called `ssh-copy-id`, which makes it pretty easy. You'll do this once for each IoT device you want to connect to using that key pair. It's a one-time setup for each device, you know?
This method is much, much safer than using a password to log in. Passwords can be guessed or cracked, but SSH keys are very, very long and complex, making them almost impossible to guess. So, by putting your public key on the IoT device, you're setting up a very strong way for your computer to prove it's you, without ever sending a password over the internet. It's a smart move for securely connect remote IoT P2P SSH Ubuntu example setups.
Keeping Your Private Key Safe
Your private key is, well, private. It's the most important part of this whole system. You must keep it safe on your computer and never, ever share it with anyone. If someone gets your private key, they could pretend to be you and get into your IoT devices. It's just like losing your house key, only for your digital stuff. So, make sure it's stored in a secure place on your computer, usually in a hidden folder called `.ssh` in your home directory.
Also, it's a good idea to back up your private key, but do it securely. If your computer crashes, you don't want to lose access to all your devices. Some people even suggest that if you feel your private key might have been compromised, you should "turn off encryption and turn it back on, the keys would be regenerated." This means making a brand new key pair and replacing the old one on all your devices. It's a bit of work, but it's a good way to stay safe, honestly.
Achieving P2P Connectivity: Methods and Tools
Reverse SSH Tunneling
Sometimes, your IoT device might be behind a tricky network, like one that doesn't let outside connections in directly. This is where something called "reverse SSH tunneling" can be super handy. Instead of you connecting to the IoT device, the IoT device connects *out* to a middle server that you control, and then you connect to that middle server. It's like the IoT device calls you, and then you can talk to it through that established call. This is a pretty clever trick, in a way.
This method basically creates a tunnel in the opposite direction. The IoT device initiates the connection to a server that's always reachable, and then that server acts as a bridge for you to connect back to the IoT device. It's a common solution for devices that are behind firewalls or on networks where direct incoming connections are blocked. It really helps to get around those connection problems, you know, when you just can't seem to get through.
VPNs for a Private Network
Another way to get a secure, P2P-like connection is to use a Virtual Private Network, or VPN. You can set up your own VPN server, perhaps on a small computer at home, and then have your IoT devices and your main computer all connect to that VPN. This creates a kind of private, virtual network where all your devices can talk to each other as if they were all in the same room, even if they're miles apart. It's a bit like building your own private internet, just for your devices.
With a VPN, all the traffic between your devices is encrypted and goes through this private network. This means you don't have to worry as much about individual SSH tunnels for each device, because the whole network is secure. It's a very comprehensive solution, and it's quite popular for managing multiple remote devices. For a securely connect remote IoT P2P SSH Ubuntu example, a VPN can provide a solid, overarching security layer, actually.
Specialized P2P Tools
Beyond standard SSH and VPNs, there are also some specialized tools that help with P2P connections for IoT. Services like ZeroTier or Tailscale, for instance, create virtual networks that make it feel like all your devices are on the same local network, no matter where they are physically. They handle the tricky parts of getting through firewalls and finding each other on the internet. These tools often use strong encryption and identity verification to keep your connections safe.
These tools can be a bit easier to set up than a full VPN server for some people, and they're designed specifically for this kind of distributed device management. They abstract away some of the network complexities, letting you focus more on what your IoT devices are actually doing. So, if you're looking for a simpler way to achieve a securely connect remote IoT P2P SSH Ubuntu example setup, these specialized P2P tools are definitely worth looking into, honestly.
A Practical Securely Connect Remote IoT P2P SSH Ubuntu Example Walkthrough
Scenario: Accessing a Home Sensor
Let's imagine you have a small Ubuntu-powered IoT sensor, maybe a Raspberry Pi, sitting in your garden, collecting weather data. You want to check on it, maybe update its software, or just see its readings, but you're away from home. This is a perfect situation for a securely connect remote IoT P2P SSH Ubuntu example. We'll set it up so you can reach it directly and safely from your laptop, no matter where you are. It's a pretty common need, you know?
The sensor is connected to your home Wi-Fi, but your home router probably has a firewall that blocks incoming connections. So, we'll use a reverse SSH tunnel through a small, affordable cloud server (a "jump host") that's always online. This way, your garden sensor will reach out to the jump host, and then you can connect to the jump host to get to your sensor. It's a very practical solution for many home IoT setups, honestly.
Step-by-Step Setup
Here's a basic outline of how you'd set this up. First, get your Ubuntu IoT device ready, as we talked about, with a fresh installation and all updates. Make sure you have SSH installed on it. Then, set up your jump host – this could be a tiny virtual private server from a cloud provider. Install SSH on that too. You'll need an SSH key pair on your laptop, and the public key needs to be on both the IoT device and the jump host. This is where the "Make sure that you are logged in with your ms account in windows" idea comes in, but for your digital identity with SSH keys, you see.
On your IoT device, you'll set up a command to automatically create the reverse SSH tunnel to your jump host. This command will tell the IoT device to connect to the jump host and open a specific port there, which will then forward traffic back to the IoT device's SSH port. You might use something like `ssh -N -R 2222:localhost:22 user@your_jump_host_ip`. The `2222` is the port on the jump host you'll use. This needs to run automatically, maybe using `systemd` or `cron`, so the tunnel is always up. It's a bit of scripting, but totally doable, actually.
From your laptop, you would then connect to your jump host, but specify that you want to connect to the forwarded port. So, you'd use a command like `ssh -p 2222 user@your_jump_host_ip`. When you do this, you're not actually logging into the jump host itself, but rather, the connection is immediately passed through to your IoT device in the garden. It's a pretty neat trick, honestly, and it makes that remote connection feel local. Learn more about SSH tunneling on our site, and you can also find more about IoT security basics on this page.
Testing Your Connection
After you've got everything set up, the very next thing you need to do is test it. Try to connect from your laptop. Did it work? Did you get a command prompt from your garden sensor? If not, check your SSH key permissions, firewall rules on the jump host, and make sure the reverse tunnel command is running correctly on the IoT device. You might feel like "I seem to be having the same problem, I have tried multiple platforms... and to no avail," but with these steps, you're on the right track. It's often just a small setting that needs tweaking, you know?
You can also try restarting the SSH service on both the jump host and the IoT device, just to make sure everything reloads properly. It's a bit like turning something off and turning it back on again, a classic troubleshooting step. Once you can connect reliably, you've successfully created a securely connect remote IoT P2P SSH Ubuntu example setup. This direct, encrypted connection gives you safe access to your device, which is a pretty good feeling, honestly.
- Prank Goes Wrong Manhwa
- Somali Nude Telegram
- Iot P2p Connect Free
- Abby Berner Leaks
- Subhashree Sahu Viral Video
Securely Connect Remote IoT P2P SSH Ubuntu Server: A Comprehensive Guide

Secure IoT: P2P SSH On Ubuntu - The Ultimate Guide!
Securely Connect Remote IoT P2P SSH Ubuntu Server: A Comprehensive Guide
