Securely Connect Remote IoT: Peer-to-Peer SSH On Ubuntu
Getting your remote gadgets to talk to you safely, especially those running Ubuntu, is a big deal these days. Think about all the little internet-connected devices out there – from smart home bits to industrial sensors. You need to reach them, maybe to check on things or make changes, but you absolutely have to keep those connections private and protected. If you've ever dealt with messages like "this connection is untrusted" or "security certificate problems," you know how important it is to have a solid, trustworthy link. That feeling of uncertainty, where you're not sure if your data is truly safe, is something we all want to avoid, so that's why we're talking about this today.
Setting up a direct, secure way to reach your Internet of Things (IoT) devices is more important than ever. It's almost like giving your devices a secret handshake that only you know, making sure no one else can listen in or mess with them. For folks who use Ubuntu on their IoT setups, getting a peer-to-peer (P2P) SSH connection just right can feel a bit like a puzzle, but it’s totally doable. This kind of setup lets your devices chat directly, without needing extra servers in the middle, which can be really handy, you know.
This guide is here to help you get a handle on how to make those connections strong and safe. We'll walk through the steps to make sure your Ubuntu-powered IoT devices are not only reachable from anywhere but also guarded against unwanted visitors. It's about getting you back on track so your connections can run more securely, much like making sure your computer gets all its important updates to keep it safe from problems, which is really pretty similar in a way.
Table of Contents
- Why Secure Connections Are a Must for IoT
- Getting Ready: Your Ubuntu IoT Device
- Setting Up SSH Keys for Ultimate Security
- Configuring SSH on Your Ubuntu IoT Device
- Making the P2P Connection
- Keeping Your IoT Connections Safe and Sound
- Common Questions About Secure IoT Connections
Why Secure Connections Are a Must for IoT
You know, it's a bit like leaving your front door wide open. If your IoT devices aren't connected securely, anyone could potentially walk right in. This is especially true when your devices are out there, far from your direct control. We've all heard about devices being "at risk" because they're missing important security bits, and that's just as true for tiny IoT computers as it is for your main desktop, so it's a real thing to think about.
The Risks of Unsecured IoT Connections
Without proper safety measures, your remote IoT devices could be easy targets. People with bad intentions might try to peek at your data, or even take control of your device to do harmful things. It's like those warnings you get about untrusted website connections, where the security certificate just isn't right, and you can't be sure if you're really talking to who you think you are. That kind of risk is something you definitely want to avoid with your IoT setup, you know.
A compromised IoT device could be a way into your whole network, or it might be used to cause problems for others. Imagine if someone could mess with your smart home thermostat, or worse, with a critical sensor in a factory. The potential for trouble is pretty big, which is why making sure your connections are locked down is so very important, as a matter of fact.
- Hanalei Swan The 30m Shark Tank Deal She Turned Down Ndash What Happened
- Subhashree Sahu Viral Video
- Wasmo Telegram Link 2025
- Somalia Wasmo
What SSH Brings to the Table
SSH, or Secure Shell, is a network tool that gives you a safe way to operate computers over an unsecured network. It's like having a private, encrypted tunnel between your computer and your IoT device. Instead of sending information out in the open, SSH wraps it up tightly, making it very hard for anyone else to read or change, so that's a good thing.
For IoT, SSH is a really good choice because it offers strong encryption and allows for key-based authentication. This means you don't have to rely on simple passwords that can be guessed; instead, you use special digital keys that are much harder to break. It's a bit like having a very complex, unique lock for each device, which is much better than a simple one, in a way.
Getting Ready: Your Ubuntu IoT Device
Before we jump into the setup, there are a few things you'll need to have in place. Think of it as gathering your tools before starting a project. Having everything ready makes the process much smoother, and you're less likely to run into unexpected hiccups, which can be annoying, you know.
What You'll Need
- An Ubuntu-based IoT device (like a Raspberry Pi running Ubuntu Server).
- A computer you'll use to connect from (your "main" computer, maybe running Windows 11, or even Ubuntu itself).
- A network connection for both your computer and the IoT device.
- Basic knowledge of using the command line on Ubuntu. If you're more familiar with Windows 10, don't worry, we'll guide you through it, so it's not too bad.
Initial Setup on Your Ubuntu IoT Device
First things first, make sure your Ubuntu IoT device is up and running and connected to your network. It's also a really good idea to get all the latest updates. Just like your main computer needs to stay current to be secure, your IoT device does too. You can do this by opening a terminal on your IoT device and typing these commands, which is pretty straightforward:
sudo apt update sudo apt upgrade -y This makes sure your device has all the newest security patches and software fixes, which is super important for keeping things safe, you know. It's a bit like getting your device back on track so it can run more securely, much like those messages about needing important security and quality updates for your main computer, which is a good thing.
Next, you'll want to make sure the SSH server is installed on your IoT device. Most Ubuntu Server installations come with it, but if not, you can install it easily. Just type this into the terminal on your IoT device:
sudo apt install openssh-server -y Once it's installed, the SSH service should start up on its own. You can check if it's running with this command, which is helpful:
sudo systemctl status ssh You should see something that says "active (running)" if everything is working correctly, which is what you want, obviously.
Setting Up SSH Keys for Ultimate Security
Using SSH keys is a much safer way to connect than using passwords. Think of it like this: instead of a key you can copy, you have a unique lock and a unique key. The "public" part of the key goes on your IoT device, and the "private" part stays safe on your computer. They have to match perfectly for the connection to happen, so it's very secure.
Generating Your SSH Key Pair (On Your Computer)
You'll create these special keys on the computer you'll be using to connect to your IoT device. Open a terminal (on Linux/macOS) or Git Bash/WSL (on Windows) and type:
ssh-keygen -t rsa -b 4096 This command creates a new SSH key pair. The `-t rsa` specifies the type of encryption, and `-b 4096` makes the key very long and strong, which is a good idea. When it asks you where to save the key, just press Enter to accept the default location (usually `~/.ssh/id_rsa`).
It will then ask you for a passphrase. This is like a password for your private key. It's a really good idea to set one, as it adds an extra layer of protection in case someone ever gets hold of your computer. If you don't set one, your private key is unprotected, which is a bit risky. Choose something you can remember but is hard for others to guess, you know.
After this, you'll have two files in your `~/.ssh/` directory: `id_rsa` (your private key) and `id_rsa.pub` (your public key). Keep your private key very safe; never share it with anyone. The public key, however, is meant to be shared with the devices you want to connect to, so that's okay to put on your IoT device.
Copying Your Public Key to the IoT Device
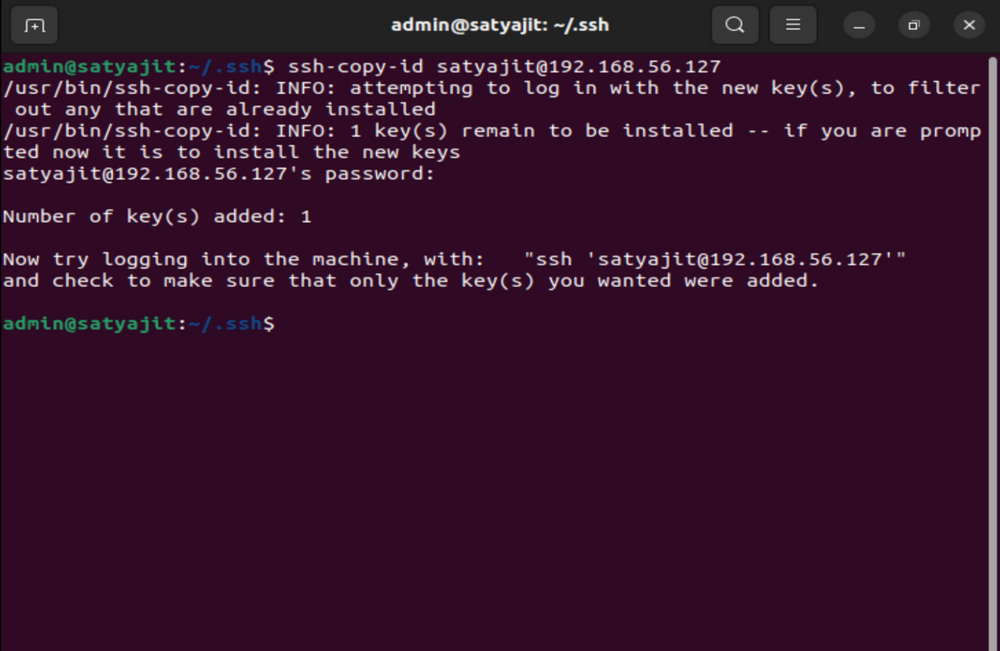
Now, you need to get that public key onto your Ubuntu IoT device. The easiest way to do this is with the `ssh-copy-id` command. From your computer, run:
ssh-copy-id your_username@your_iot_device_ip Replace `your_username` with the actual username on your IoT device (often `ubuntu` or `pi`), and `your_iot_device_ip` with the actual IP address of your IoT device. The first time you connect, it might ask you to confirm the connection because it doesn't recognize the device, which is a normal security check, a bit like when Firefox asks if you trust a new website, so that's pretty much it.
You'll be asked for your IoT device's password. Once you enter it, your public key will be copied to the `~/.ssh/authorized_keys` file on the IoT device. This file tells the SSH server which public keys are allowed to connect, which is pretty handy. If you don't have `ssh-copy-id` (common on some Windows setups without WSL), you can do it manually. First, display your public key on your computer:
cat ~/.ssh/id_rsa.pub Copy the entire output. Then, connect to your IoT device using its password (just this one time):
ssh your_username@your_iot_device_ip Once logged in, create the `.ssh` directory if it doesn't exist and set the right permissions:
mkdir -p ~/.ssh chmod 700 ~/.ssh Now, open the `authorized_keys` file for editing and paste your public key into it. You can use a text editor like `nano`:
nano ~/.ssh/authorized_keys Paste your key, save the file (Ctrl+O, Enter), and exit (Ctrl+X). Finally, set the correct permissions for this file, which is very important for security:
chmod 600 ~/.ssh/authorized_keys This step is crucial; if the permissions are wrong, SSH won't use the key, and you'll have trouble connecting, so make sure to do it.
Configuring SSH on Your Ubuntu IoT Device
Now that your public key is on the IoT device, we can make some changes to the SSH server's settings to make it even more secure. This is where we tell the server to only allow connections using those special keys, which is much safer, you know.
Tightening Security Settings for SSHD
On your Ubuntu IoT device, you'll need to edit the SSH server configuration file. It's usually located at `/etc/ssh/sshd_config`. Open it with `sudo` and a text editor:
sudo nano /etc/ssh/sshd_config Look for these lines and change them or make sure they are set like this. If a line starts with a `#`, it means it's a comment, so remove the `#` to activate the setting:
- `Port 22`: This is the default SSH port. While changing it can sometimes deter very basic scans, it's not a true security measure. You can change it to something else (e.g., `Port 2222`), but remember to specify it when connecting. For now, leaving it at 22 is often fine if other security measures are strong, so it's up to you.
- `PermitRootLogin no`: This is a big one. It stops anyone from directly logging in as the `root` user, which has full control over the system. Always connect with a regular user account and use `sudo` for administrative tasks. This is a very important security step, you know.
- `PasswordAuthentication no`: This is also very important. Once you're sure your key-based authentication works, turn off password logins completely. This means only people with the correct SSH private key can connect, which is much more secure.
- `ChallengeResponseAuthentication no`: Turn this off too. It's another method for password-based login that you don't want.
- `UsePAM yes`: Keep this as `yes`.
- `X11Forwarding no`: Unless you specifically need to run graphical applications over SSH, turn this off. It's usually not needed for IoT devices.
After making these changes, save the file (Ctrl+O, Enter) and exit (Ctrl+X). These changes will make your SSH server much tougher to break into, which is really good for your IoT device's safety, you know.
Restarting the SSH Service
For your changes to take effect, you need to restart the SSH service on your IoT device. Do this from the device's terminal:
sudo systemctl restart ssh If you made a mistake in the `sshd_config` file, the service might not restart. If that happens, you'll need to go back and fix the error. It's a good idea to have a local keyboard and monitor connected to your IoT device for this step, just in case you get locked out, so that's a useful tip.
Making the P2P Connection
Now comes the exciting part: connecting to your remote Ubuntu IoT device using your SSH keys. This is the moment where all your setup work pays off, and you get that secure, direct link, which is pretty cool, you know.
Connecting from Your Computer
From your computer, open your terminal (or Git Bash/WSL) and try to connect:
ssh your_username@your_iot_device_ip If you changed the SSH port in `sshd_config`, you'll need to specify it:
ssh -p 2222 your_username@your_iot_device_ip If everything is set up correctly, it should ask you for the passphrase for your private SSH key (if you set one). After you enter it, you should be logged into your remote Ubuntu IoT device. You won't be asked for a password for the user on the IoT device, which is the whole point of key-based authentication, and it's much faster, too.
If you get an error like "Permission denied (publickey)", it means the SSH server on your IoT device isn't accepting your key. Double-check the permissions on `~/.ssh` and `~/.ssh/authorized_keys` on the IoT device, and make sure your public key is correctly pasted into `authorized_keys`. Also, confirm `PasswordAuthentication no` is actually `no` and not commented out, you know.
Using SSH Config for Easier Access
For even easier access, especially if you have multiple IoT devices or use a custom port, you can create an SSH configuration file on your local computer. This file is typically at `~/.ssh/config` (create it if it doesn't exist). Open it with a text editor:
nano ~/.ssh/config Add an entry for your IoT device, something like this:
Host myiotdevice HostName your_iot_device_ip User your_username Port 2222 # Only if you changed the port from 22 IdentityFile ~/.ssh/id_rsa # Path to your private key Save and close the file. Now, you can connect simply by typing:
ssh myiotdevice This makes connecting much quicker and less prone to typing errors, which is quite nice, really. It's a small change that makes a big difference in daily use, so it's worth doing, you know.
Keeping Your IoT Connections Safe and Sound
Setting up secure SSH is a big step, but keeping your connections safe is an ongoing effort. Just like your main computer needs regular check-ups, your IoT devices and their connections do too. It's a bit like making sure your car has its oil changed regularly; it keeps things running smoothly and safely, you know.
Regular Updates Are Key
Make it a habit to regularly update the software on your Ubuntu IoT devices. New security vulnerabilities are found all the time, and software updates often include fixes for these. You can do this remotely via your SSH connection:
sudo apt update && sudo apt upgrade -y This simple step can prevent a lot of potential problems down the road. An out-of-date device is an at-risk device, and that's something we want to avoid, obviously.
Firewall Rules for Added Protection
Consider setting up a firewall on your Ubuntu IoT device using `ufw` (Uncomplicated Firewall). This lets you control which types of connections are allowed into your device. You can
- V3 Vegamovies.bitbucket.io
- Maplestar Animations
- Best Remoteiot Device Platforms
- Remoteiot Device Ssh
- Howard Morley Oregon

Mastering Secure Connections: A Comprehensive Guide To RemoteIoT P2P
Securely Connect Remote IoT P2P SSH Ubuntu Server: A Comprehensive Guide

Secure IoT: P2P SSH On Ubuntu - The Ultimate Guide!
