Your Practical SSH Remote IoT Tutorial: Connecting Devices Securely
Have you ever wanted to connect to your smart gadgets or remote sensors from far away, maybe even from the comfort of your couch? So, making that happen securely is a big deal, especially when you think about all the little devices out there that need our attention. This guide is here to help you get started with Secure Shell, or SSH, for your Internet of Things (IoT) setups.
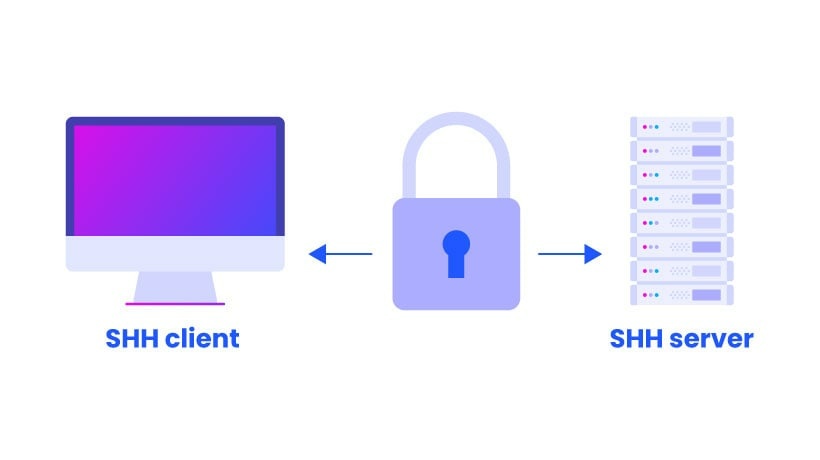
You know, it's almost like having a secret, protected pathway directly to your devices, letting you send commands or get information without worrying too much about prying eyes. This is pretty important for everything from managing a tiny home automation gadget to keeping an eye on industrial sensors in distant places. Basically, SSH lets you talk to your devices safely.
We will walk through the basics of how SSH works for these small devices, making sure you feel good about setting up your own secure connections. You'll learn how to get your devices talking to you safely, which is rather useful. This way, you can handle your IoT projects with a bit more confidence, and that's a good thing.
Table of Contents
- Understanding SSH: The Secure Foundation
- Why SSH for Remote IoT?
- Getting Ready: What You Need
- Setting Up SSH on Your IoT Device
- Your Computer's Role
- Making Your First SSH Connection
- Basic Connection Commands
- Using Specific SSH Keys
- Managing SSH Keys for Better Security
- Generating Your Own Key Pair
- Adding Your Public Key to Devices
- Dealing with Key Changes and Warnings
- Common Challenges and Solutions
- "Connection Reset by Peer" and Access Issues
- Working with Remote Files and Directories
- Understanding Server Responses (or Lack Thereof)
- Keeping Your SSH Connections Safe
- Frequently Asked Questions About SSH and IoT
- Wrapping Things Up
Understanding SSH: The Secure Foundation
So, what exactly is SSH? Well, it stands for Secure Shell. It's a very helpful software package that lets you look after systems and move files over networks that might not be very safe on their own. It's used just about everywhere, in almost every data center and in every big company. This means it's a pretty big deal for keeping things private and safe.
The SSH protocol, which people also call Secure Shell, is a way to log in securely from one computer to another, even if they are far apart. It gives you a few different ways to prove who you are, making sure only the right people get in. This method was first created as a free version by Tatu Ylonen and later made even better by the folks at OpenBSD. You can learn more about its history and how it works by visiting the OpenSSH project website.
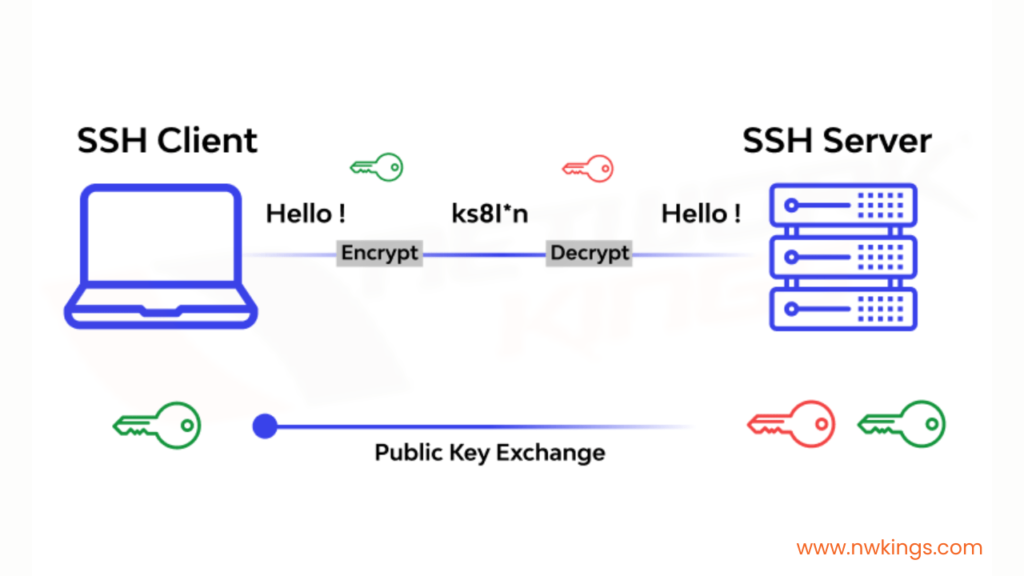
When you use SSH, it sets up a protected tunnel between your computer and the device you want to reach. This tunnel makes sure that whatever information you send back and forth stays private. It's like having a private conversation where no one else can listen in. That's why it's such a popular choice for anything that needs to be kept safe, like your IoT gadgets. It really helps keep things locked down, which is good.
- Hanalei Swan The 30m Shark Tank Deal She Turned Down Ndash What Happened
- Vegmovies
- Aditi Mistry Nipples
- Wasmo Telegram Link 2025
- Howard Morley Oregon
Why SSH for Remote IoT?
You might wonder why SSH is so important for those little IoT devices. Think about it: these gadgets are often out in the open, connected to the internet, and sometimes holding sensitive information. Without a good way to talk to them safely, they could be open to all sorts of bad stuff. SSH helps because it provides a strong layer of protection for these connections. It's very, very good at that.
For example, if you have a sensor gathering data in a remote spot, you need to be able to get that data or change settings without someone else sneaking in. SSH makes sure that when you connect, it's really you, and that the information stays private. It helps stop what people call "man in the middle" attacks, where someone tries to pretend to be your device to steal your information. Every host has a key, and your computer remembers it, so if that key suddenly changes, it tells you, which is a big warning sign. This is a crucial safety feature, actually.
Also, many IoT projects involve moving files, perhaps new software updates or configuration files, to your devices. SSH lets you do this securely, which is rather handy. It's not just about logging in; it's about making sure all your interactions with the device are protected. This is why it's become a standard tool for anyone working with remote gadgets, big or small. You can, like, totally rely on it for secure file transfers, too.
Getting Ready: What You Need
Before you start connecting to your IoT devices, you'll need a few things set up. It's not too complicated, but getting these basics right makes everything else much smoother. You know, just a little bit of preparation goes a long way. This is pretty much step one.
Setting Up SSH on Your IoT Device
Most IoT devices that run Linux, like a Raspberry Pi, come with SSH capabilities built in or can have them added easily. You'll usually need to make sure the SSH server, often called `sshd`, is running on your device. For many, it's as simple as enabling it through a configuration tool or running a command. For instance, on a Raspberry Pi, you might use `sudo raspi-config` and turn on SSH. This step is pretty important for the device to listen for your connection requests.
Make sure your device is connected to your network, either by Wi-Fi or an Ethernet cable. You'll also need to know its IP address or hostname. This is how your computer will find it on the network. Without knowing where your device is, you can't really talk to it, so that's a key piece of information to find out. It's like needing an address to send a letter, you know.
Your Computer's Role
On your personal computer, you'll need an SSH client. If you're using macOS or Linux, you're in luck! The SSH client is usually already there, built right into your terminal. You can just open a terminal window and start typing SSH commands. It's very convenient, honestly.
If you're on a Windows machine, you might need to get a separate program. PuTTY is a very popular choice for Windows users. It's a free SSH and Telnet client that's been around for a long time. You can download the latest version and find instructions for setting it up, including how to manage SSH keys, from their official website. PuTTY makes connecting from Windows quite simple, which is rather nice.
Making Your First SSH Connection
Once your IoT device is ready and your computer has an SSH client, you can try making your first connection. This is where things get exciting, as you're about to talk directly to your remote gadget. It's kind of like reaching out across the airwaves.
Basic Connection Commands
The most basic way to connect is by opening your terminal (or PuTTY) and typing a simple command. You'll need the username on your IoT device and its IP address or hostname. The command looks like this:
ssh username@ip_address_or_hostnameFor example, if your Raspberry Pi's username is `pi` and its IP address is `192.168.1.100`, you would type `ssh pi@192.168.1.100`. The first time you connect to a new device, your computer might ask you to confirm its "host key." This is a safety check to make sure you're connecting to the right device and not some imposter. You should type `yes` to accept it, and your computer will remember it for next time. It's pretty straightforward, really.
Using Specific SSH Keys
While you can use passwords to log in, using SSH key pairs is a much safer and more convenient way. A key pair has two parts: a private key that stays secret on your computer and a public key that you put on your IoT device. When you connect, these keys work together to prove who you are without sending a password over the network. This is a very secure method, by the way.
Sometimes, you might need to connect to a specific server, like an SSH proxy, using a key that isn't your usual `id_rsa` key. This happens when you have different keys for different projects or levels of access. To tell SSH which key to use, you add the `-i` option followed by the path to your private key file. For example:
ssh -i ~/.ssh/my_iot_key username@ip_address_or_hostnameThis tells your SSH client to use `my_iot_key` instead of looking for the default key. This is rather helpful when you're dealing with multiple secure connections, making sure you use the right credentials for the right place. It gives you more control, which is good.
Managing SSH Keys for Better Security
Handling your SSH keys properly is a big part of keeping your remote IoT connections safe. It's not just about having keys; it's about how you create them, where you put them, and what you do when things seem a little off. This is very important for peace of mind, too.
Generating Your Own Key Pair
If you don't have an SSH key pair already, making one is quite simple. You can open your terminal and type `ssh-keygen`. The program will ask you where to save the keys and if you want to set a passphrase. A passphrase is like a password for your private key, adding an extra layer of protection. It's a really good idea to use one, actually, especially for important keys.
ssh-keygenThis command will create two files, typically `id_rsa` (your private key) and `id_rsa.pub` (your public key) in a hidden folder called `.ssh` inside your home directory. Remember, your private key should never leave your computer or be shared with anyone. Your public key, however, is meant to be shared with the devices you want to connect to. That's the one you'll be putting on your IoT gadgets. It's pretty straightforward, you know.
Adding Your Public Key to Devices
To use your SSH key for logging into an IoT device, you need to copy your public key to that device. Specifically, you put it into a file called `authorized_keys` inside the `.ssh` folder of the user you want to log in as. There's a handy command called `ssh-copy-id` that does this for you automatically:
ssh-copy-id username@ip_address_or_hostnameIf `ssh-copy-id` isn't available, or if you prefer to do it by hand, you can copy the contents of your public key file. On a Mac, you can use `pbcopy < ~/.ssh/id_rsa.pub` to put your public key onto your clipboard. Then, you can log into your IoT device with a password (just this once!) and paste the key into the `~/.ssh/authorized_keys` file. Make sure the permissions on the `.ssh` folder and `authorized_keys` file are correct (usually `700` for the folder and `600` for the file) so SSH will use them. This is very important for security, too.
This process is also how you add keys to services like GitHub or GitLab. After installing Git on a new work computer, generating an SSH key, and adding it to GitLab, you might try to clone a project. You just copy your public key, go to your account settings, find the SSH and GPG keys section, add a new SSH key, give it a title, and paste your key. This lets you pull and push code without typing a password every time, which is rather convenient. It's a very common practice, honestly.
Dealing with Key Changes and Warnings
When you connect via the SSH protocol, every host has a key. Your SSH client remembers the host key connected with a particular address and will refuse to connect if a host key appears to change. This is a big help in stopping those "man in the middle" attacks we talked about. If the host key for a domain, say `domain.example`, has changed, your SSH client will give you a warning. It might say something like, "The host key for domain.example has changed."
If this warning pops up and you weren't expecting it, you should be a bit cautious. It could mean someone is trying to trick you. However, sometimes host keys genuinely change, like if the server was rebuilt or its IP address was reassigned to a different machine. If you're sure everything is fine, you can remove the old key from your `~/.ssh/known_hosts` file. Your SSH client will tell you which line to remove. Then, the next time you connect, it will ask you to accept the new key. This is a pretty important step to keep your connections safe, you know.
Common Challenges and Solutions
Even with the best planning, you might run into some bumps along the road when using SSH. It's just part of working with technology. Knowing what some common issues are can save you a lot of head-scratching. We've all been there, honestly, facing a stubborn connection.
"Connection Reset by Peer" and Access Issues
One common message you might see is "Connection reset by peer." This means the other side, your IoT device, closed the connection unexpectedly. This can happen for a few reasons. Sometimes, it's about incorrect access rights or permissions. For instance, if you recently changed your Apple ID password and then updated your Apple ID and restarted your Mac, you might find Git commands like `git pull origin master` giving you errors like "Connection reset by 20.205.243.166 port 22 fatal: Could not read from remote repository. Please make sure you have the correct access rights."
This often points to your SSH key not being correctly recognized or having the wrong permissions. Make sure your private key file (`id_rsa` or your specific key) has the right permissions on your computer (usually `400` or `600`), meaning only you can read it. Also, double-check that your public key is correctly placed in the `authorized_keys` file on your IoT device and that its permissions are set right. Firewalls on either end can also block port 22 (the default SSH port), so check those too. It's a bit like checking all the locks on a door, you know.
Working with Remote Files and Directories
SSH is not just for logging in; it's also great for moving files. If you need to copy an entire directory from your local machine to a remote IoT device, the `scp` (secure copy) command is your friend. It works a lot like the `cp` command but over an SSH connection. For example, to copy a directory called `my_data` from your computer to your IoT device:
scp -r my_data/ username@ip_address_or_hostname:/path/to/destination/The `-r` flag means "recursive," which tells `scp` to copy the directory and everything inside it. If you want to copy from the remote device to your local machine, you just swap the source and destination. It's rather flexible. This is very helpful for deploying updates or pulling logs from your devices, too.
Understanding Server Responses (or Lack Thereof)
Sometimes, you might run an SSH command, and your remote script returns an error code, like `255`, and SSH just shows you that result. This means the script itself had a problem. You might need to look at the script on the remote device to figure out what went wrong. The server won't always give you a detailed explanation, which is a security measure to hide details from potential attackers. It's kind of like a silent alarm, you know.
Another thing you might notice is if you run SSH and your "display is not set." This means SSH is not forwarding the X11 connection, which is needed for graphical applications. If you're trying to run a graphical program on your IoT device and see this, you might need to enable X11 forwarding in your SSH client or server configuration. It's a specific thing, but good to know about if you need it. This can be a bit confusing at first, honestly.
Keeping Your SSH Connections Safe
The secure shell protocol is widely used, so knowing how to keep your connections safe is really important. With threats always changing, staying on top of security is a continuous effort. You know, it's not a one-and-done thing.
One big piece of advice is to always use SSH keys instead of passwords for your IoT devices. If you must use passwords, make them very strong and change them often. Also, keep your private keys safe on your computer. Make sure they have strict permissions so only you can read them. This is a very basic but important step.
Keep your SSH client and server software updated. Updates often include fixes for security holes that attackers might try to use. Think of it like patching holes in a fence. Also, consider setting up a firewall on your IoT devices to only allow SSH connections from specific IP addresses you trust. This adds another layer of protection, which is rather smart.
It's worth remembering that attackers are always finding new ways to get in. As Suvi Lampila, an SSH fellow, explains, "AI enables attackers to move horizontally within systems in seconds—turning a single crack into complete control almost instantly." This means that strong, well-managed SSH connections are more important than ever. So, keeping your systems secure is a continuous task, and SSH is a major part of that. You can find more helpful information on securing your devices by checking out this page on our site.
Frequently Asked Questions About SSH and IoT
How do I connect to a remote IoT device using SSH?
You connect by using an SSH client on your computer and providing the username and IP address of your IoT device. For example, you would type `ssh username@ip_address` in your terminal. It's usually a good idea to set up SSH key pairs for a safer connection, too. This makes the process smoother and more secure, honestly.
What are common SSH issues when connecting to IoT?
Common issues include "Connection reset by peer" errors, which can mean problems with access rights, firewall settings, or network issues. You might also run into
Introduction to SSH (Secure Shell) | by Aqeel Abbas | Medium

Windows SSH Server | Learning, Secure shell, Software engineer
What Is SSH? A Beginner’s Guide To Secure Shell - IPXO
